AWS using CLI
Using CLI to access AWS

So, what is AWS?
AWS (Amazon Web Services) is a comprehensive, evolving cloud computing platform provided by Amazon that includes a mixture of infrastructure as a service (IaaS), platform as a service (PaaS) and packaged software as a service (SaaS) offerings. AWS services can offer an organization tools such as compute power, database storage and content delivery services.
AWS launched in 2006 from the internal infrastructure that Amazon.com built to handle its online retail operations. AWS was one of the first companies to introduce a pay-as-you-go cloud computing model that scales to provide users with compute, storage or throughput as needed.
AWS offers many different tools and solutions for enterprises and software developers that can be used in data centers in up to 190 countries. Groups such as government agencies, education institutions, nonprofits and private organizations can use AWS services.
AWS can be accessed in 3 ways:
- Using WEB UI(Web Interface (Console)).
- Automation (Application Programming Interface).
- Using CLI (Command Line Interface).
The AWS Command Line Interface (CLI) is a unified tool to manage your AWS services. With just one tool to download and configure, you can control multiple AWS services from the command line and automate them through scripts.
The AWS CLI v2 offers several new features including improved installers, new configuration options such as AWS Single Sign-On (SSO), and various interactive features.
Why use CLI when WEBUI is available?
In the WEB UI, everything needs to be done manually and the CLI is mostly used to automate the things and make things happen faster or agile. Even in the companies use CLI to do the tasks.
If we want to launch 5 instances, we need to launch instances for 5 times whereas in CLI, we can launch them at a time.
To access AWS from CLI, we need to install AWS CLI 2.

By clicking on the For the latest version of AWS CLI:https://awscli.amazonaws.com/AWSCLIV2.msi
we can download the file and then install it.
Then go to Command prompt using Win+R and type aws --version to make sure the AWS CLI is installed.

STEP 1:From the AWS dashboard, search for the “IAM” service as shown below, and select it.


STEP 3: On this screen, provide the details for the IAM user:
- User name =AWS_CLI
- Access type = Programmatic access

STEP 4: Set Permissions
Go to Attach Existing Policies Directly.
Now select POWER USER ACCESS

Create User
We did not create any security group or any key pair while creating this IAM user because want to create them using CLI.

STEP 5: Download “credentials.csv”
On this screen, you will be only prompted to download the “credentials.csv” file only once, so make sure you download them to your computer at this point.


Creating a new Key-Pair in our AWS account?


Then type aws ec2 create-key-pair --key-name <value>

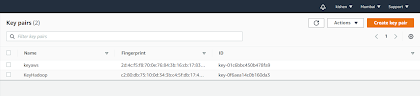
As we see, a keypair named keyaws is present which means the keypair is successfully created using CLI.
Creating a security group in our AWS using CLI:

Then type aws ec2 create-security-group --group-name <value> --description Help


Creating an EC2 instance from above created Security Group and Key pair using CLI:


Creating an EBS volume from CLI:


Attaching the EBS volume we created to the instance we launched from CLI:


Comments
Post a Comment