Automation of Technology using Python-Script
Automation of Technology using Python-Script

To Integrate Docker With Python3
Description
— — — — — — — — — — — — — — — — — — — — — — — —
- To Configure Docker on Top of REDHAT LINUX 8
- To Start Docker
- To Stop Docker
- To launch a container on Docker
- To Start and attach Container (if already exists)
- To stop container
- To check for Running Container
- To check for all container (Either running or stopped)
- To delete/remove the container on docker
— — — — — — — — — — — — — — — — — — — — — — — — —
SEE MENU OF DOCKER ON PYTHON:

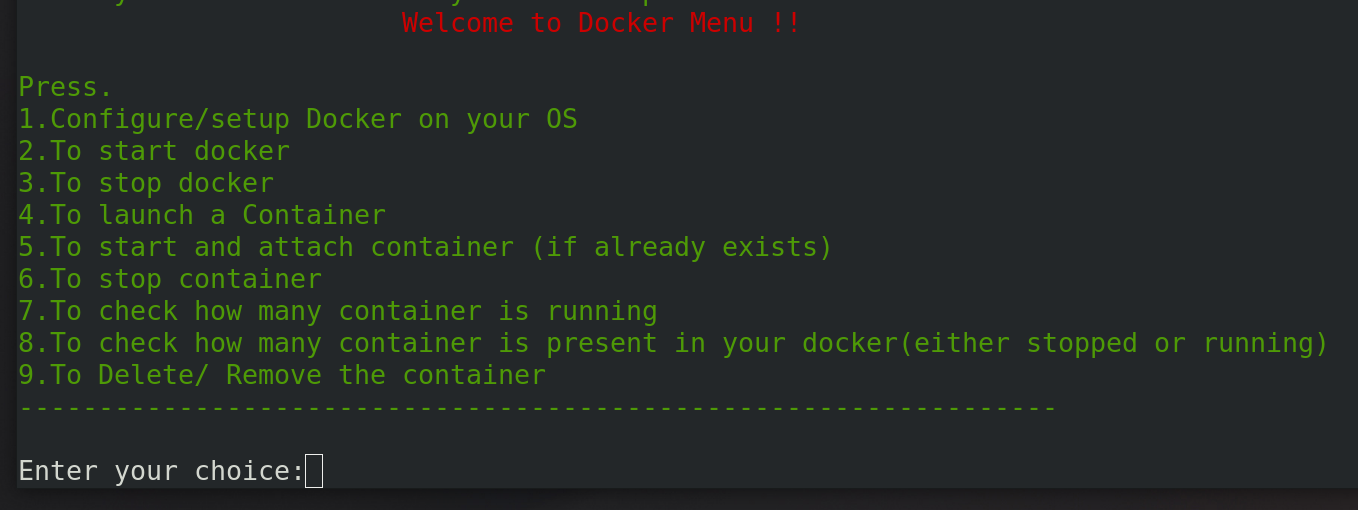
STEP 1.
- To Configure Docker on Top of REDHAT LINUX 8


There has to some step to follow to configure docker on Redhat linux 8.

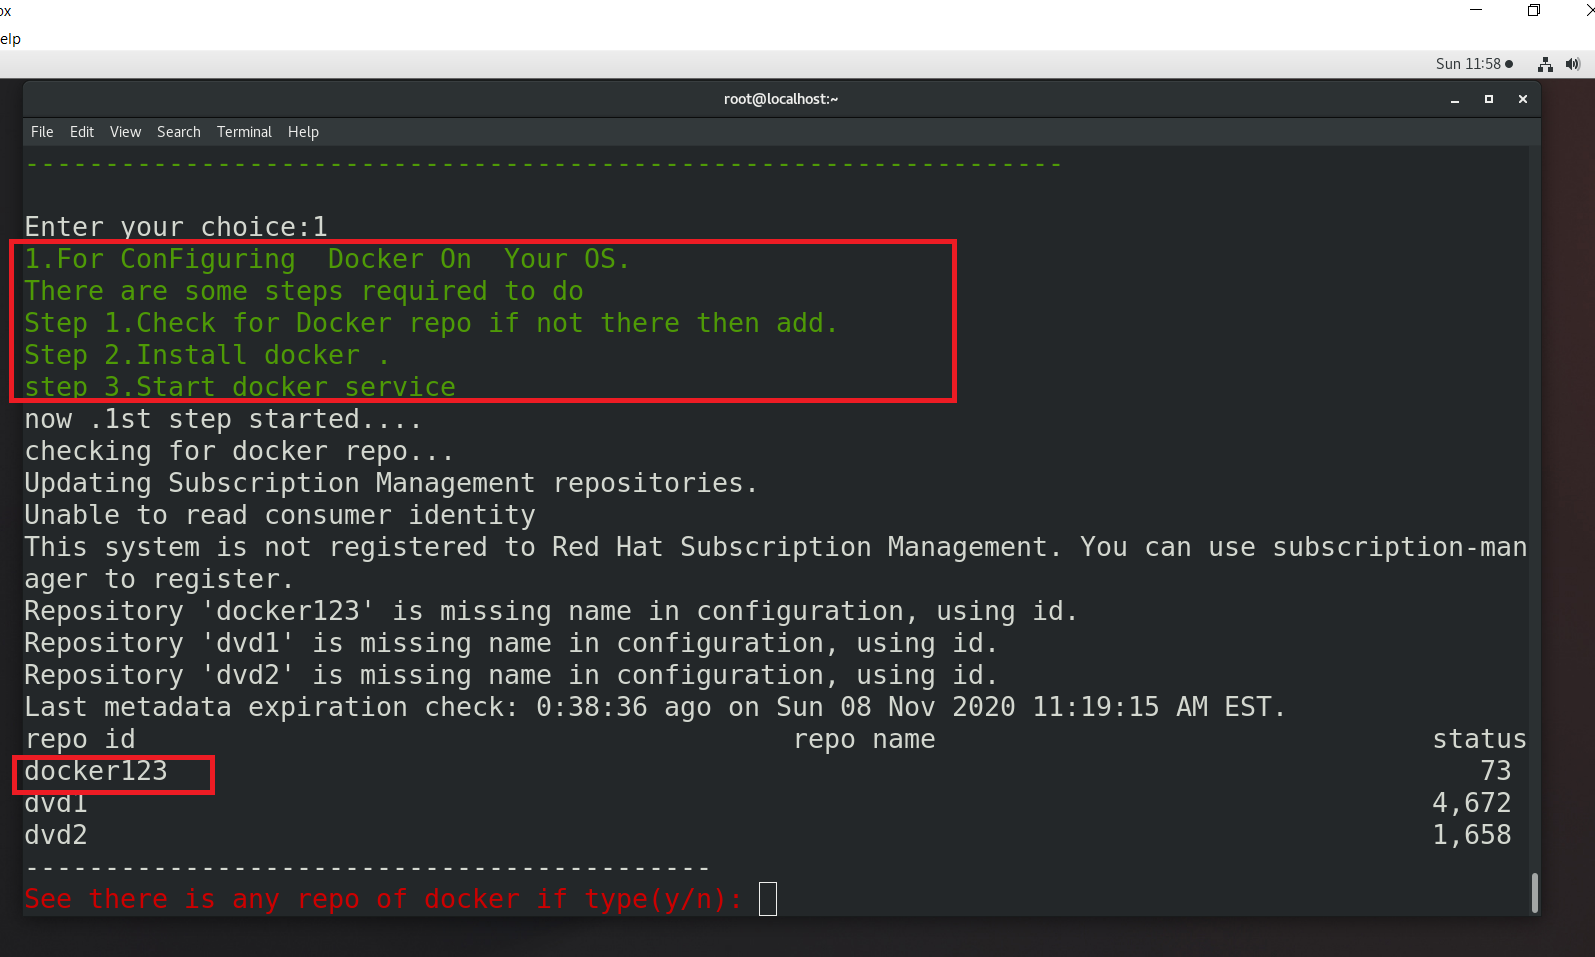
In my case docker repo is already exists i have configured so i pressed ‘y’

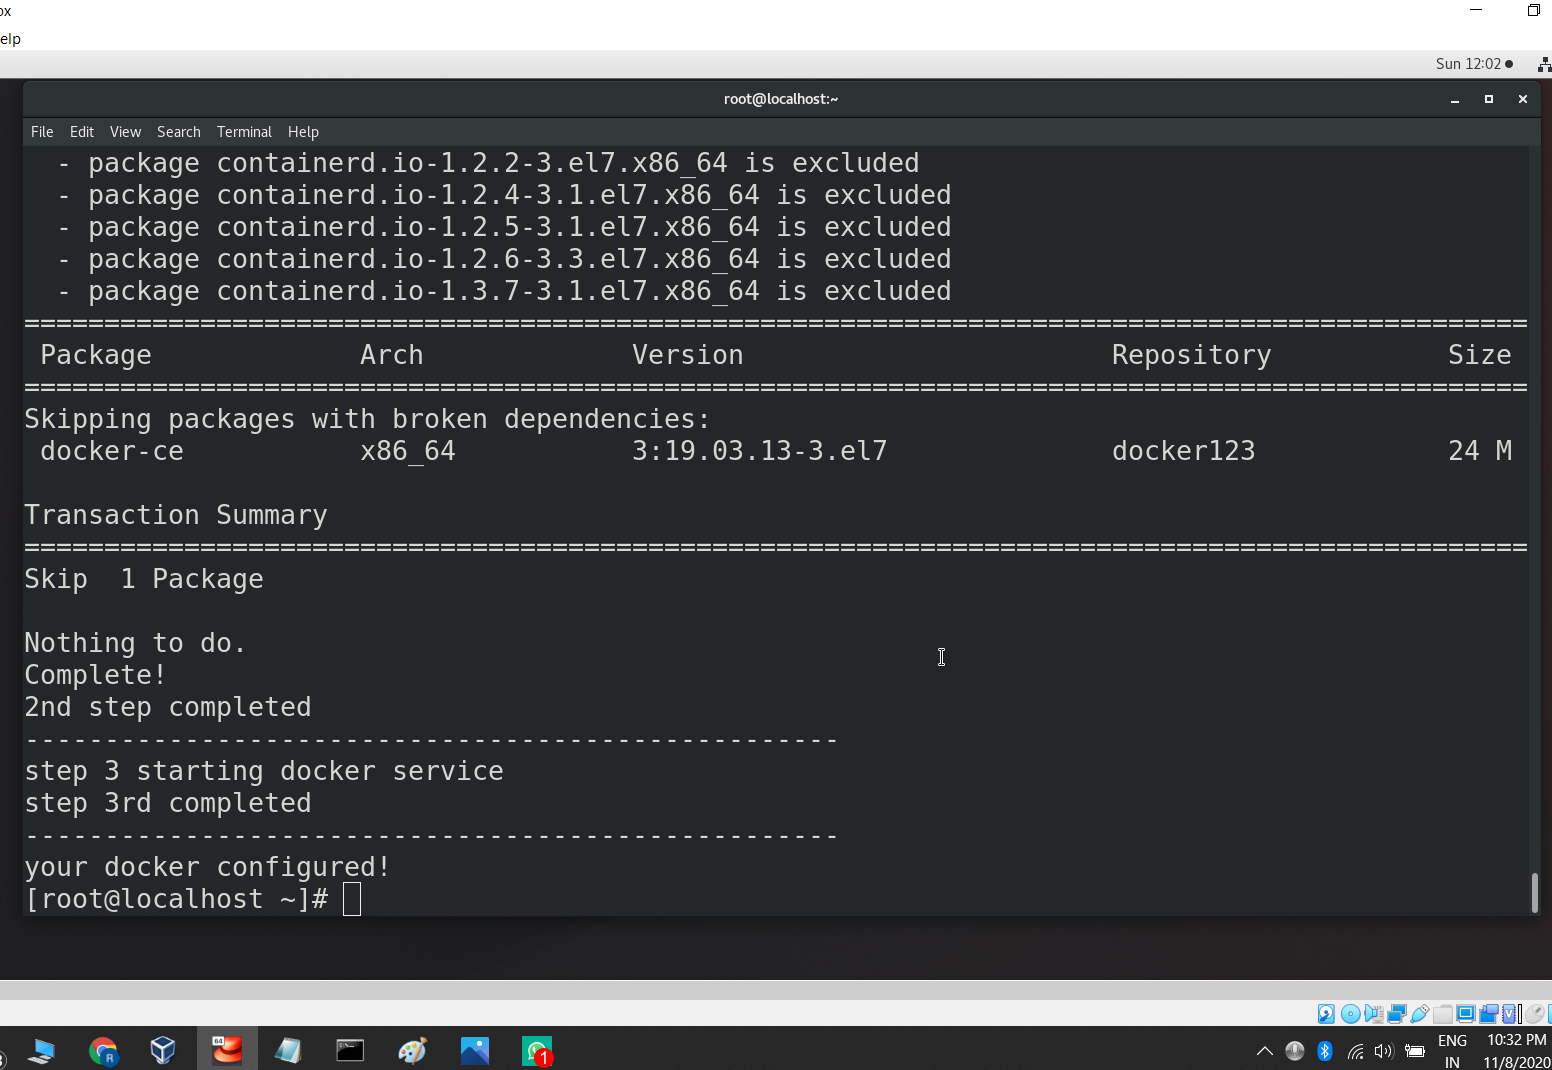
and My Docker configured.
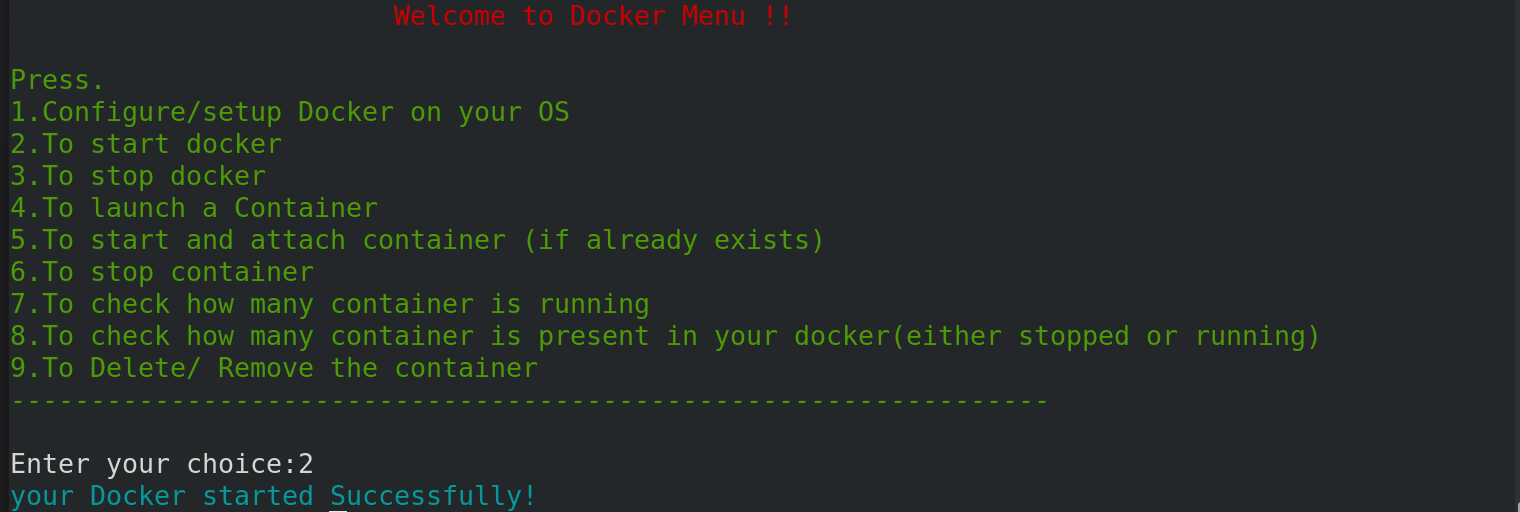
STEP 2.
To Start Docker

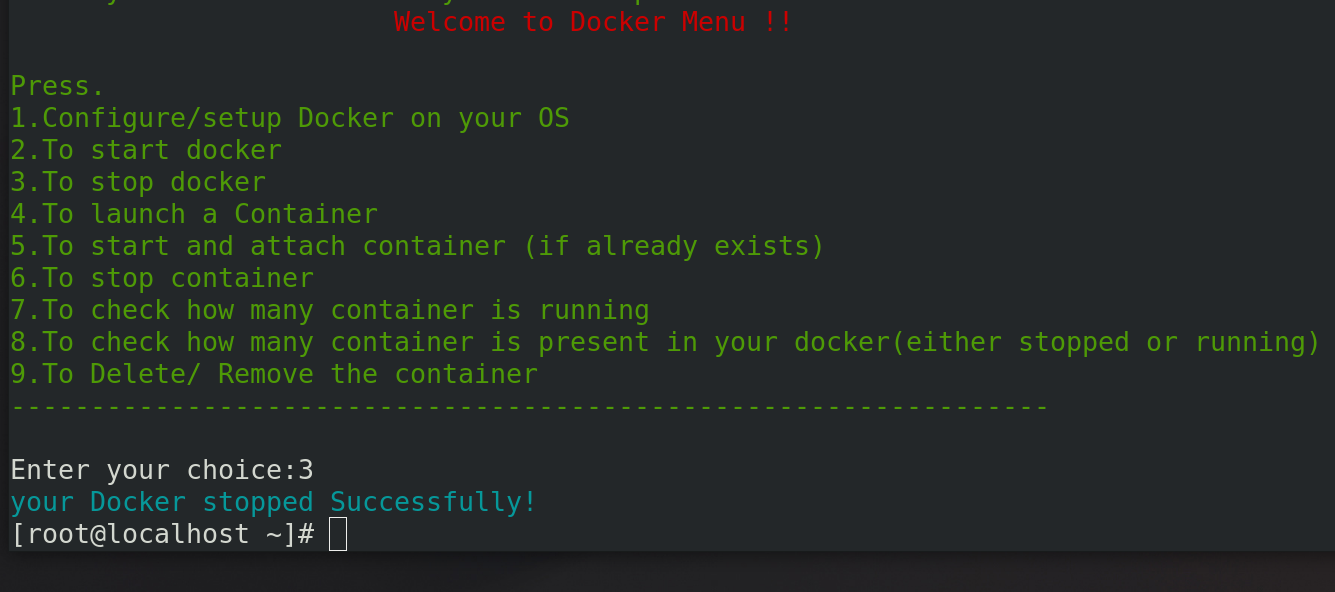
STEP 3.
To Stop Docker

STEP 4.
To Launch a container/OS on Docker

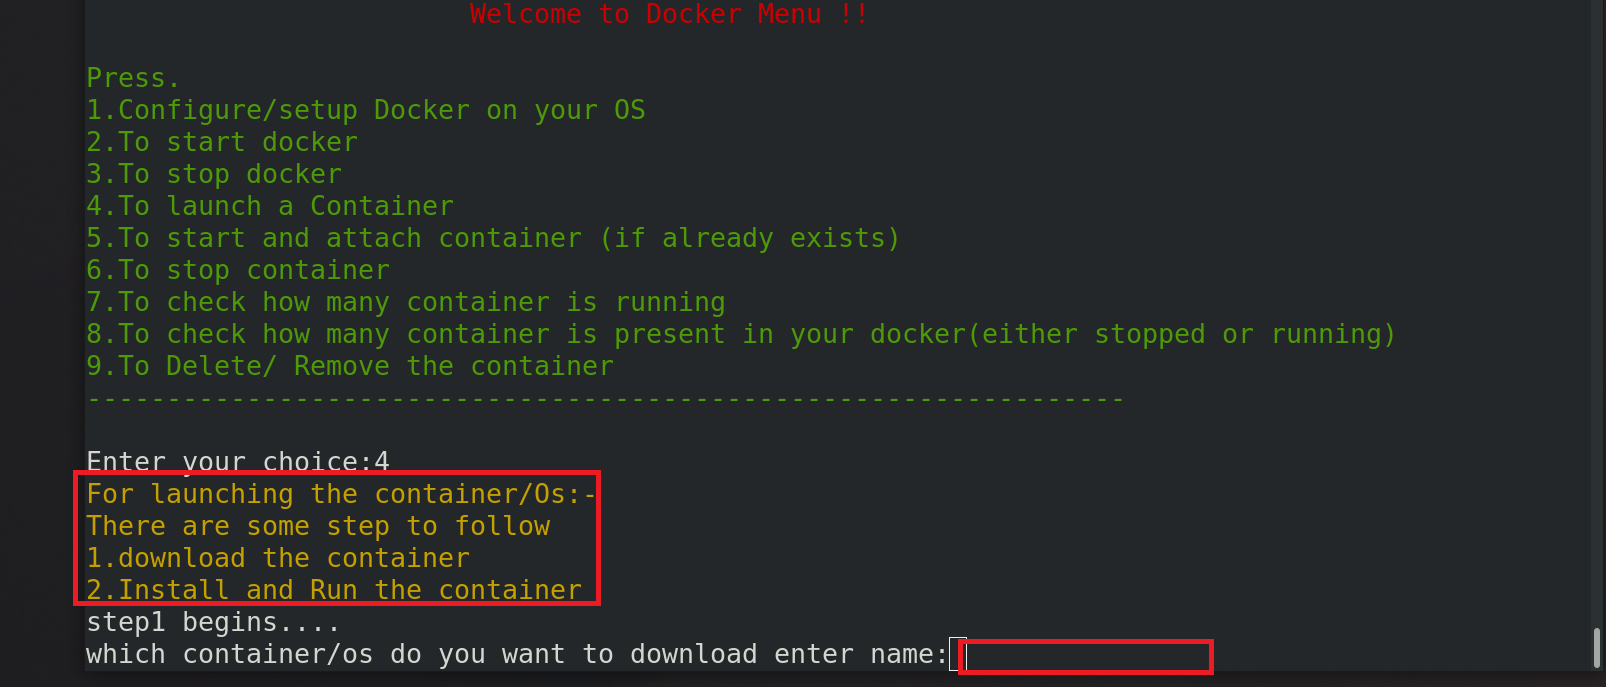
There has some step required to Launch container
- Download container
- Install and run container

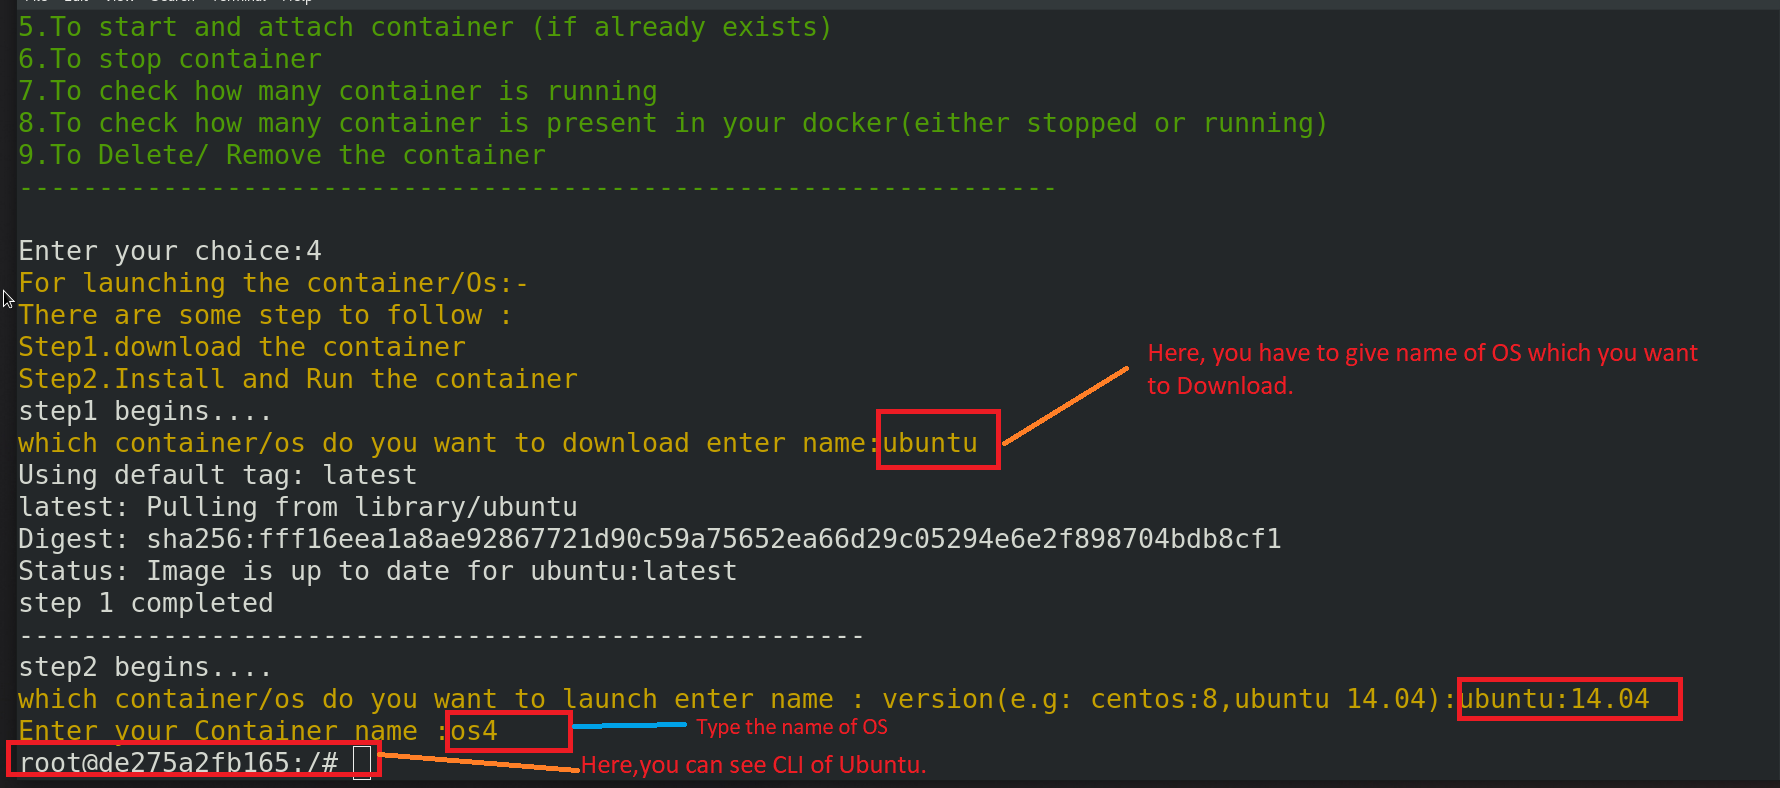
In my Case I downloaded Ubuntu and Install Ubuntu 14.04.
See ,In last CLI of Ubuntu coming up.
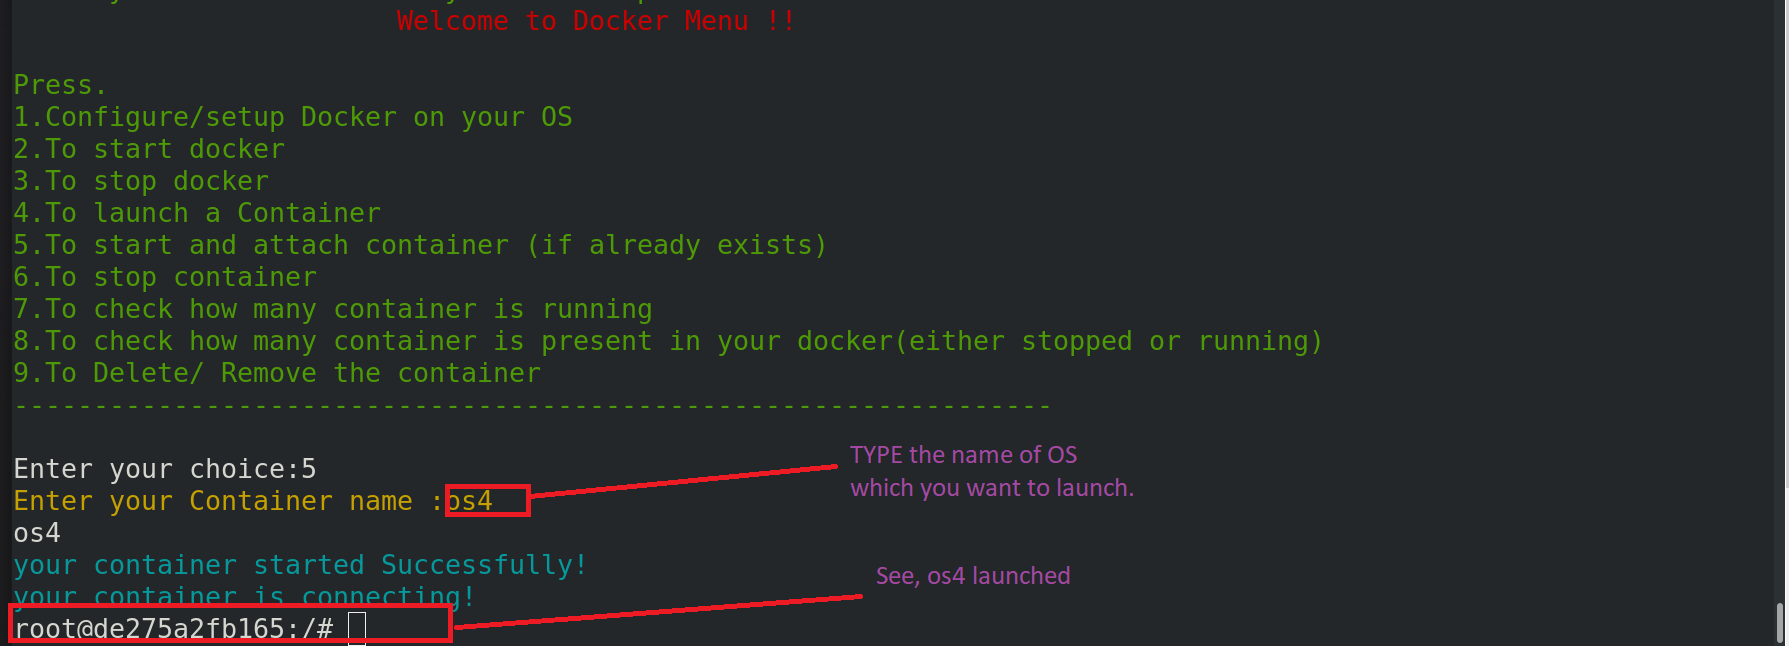
STEP 5.
To start and Launch a container(if already exists)
In my case I just launched an Ubuntu container named os4.

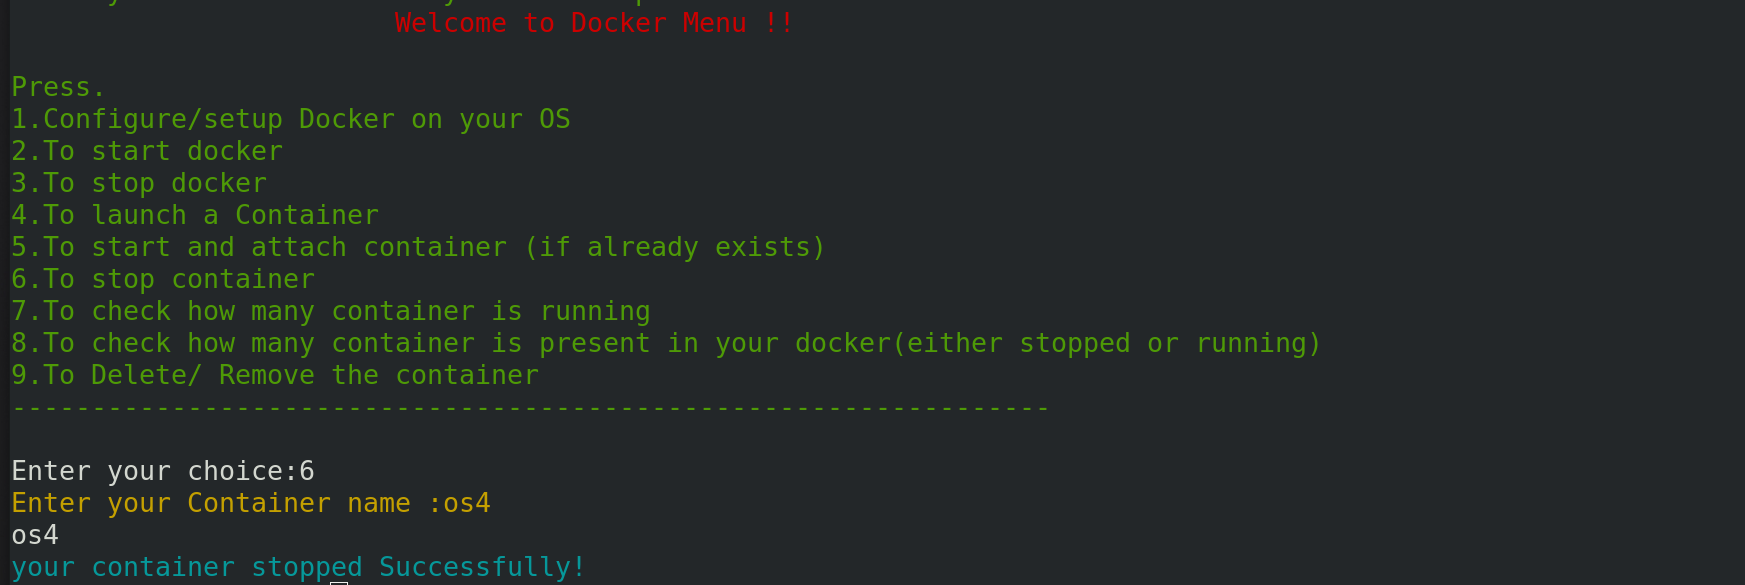
STEP 6.
To stop container/OS
In my case I stopped os4 container.

STEP 7.
To check for Running Container

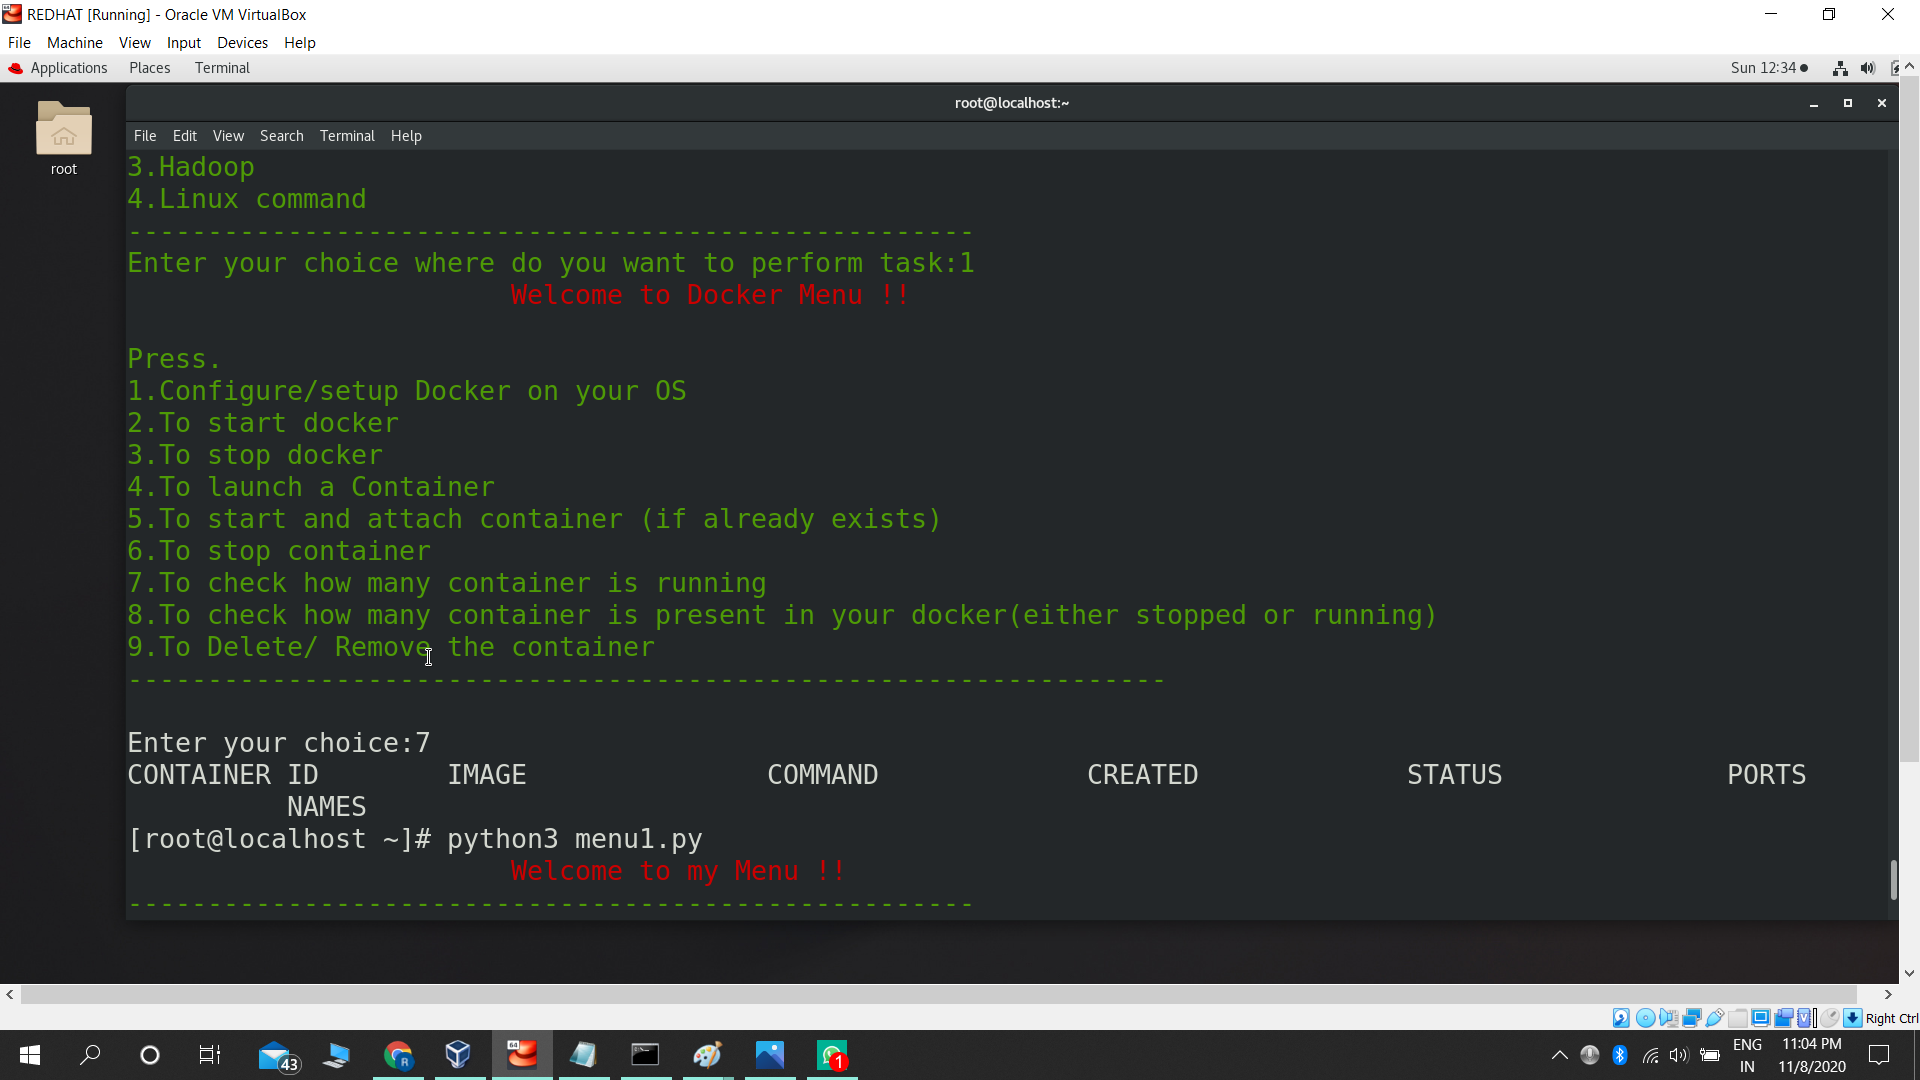
here, you can see no container is running . I launched os4 and stopped os4 so no container is running.
STEP 8.
To check for all container (Either running or stopped)

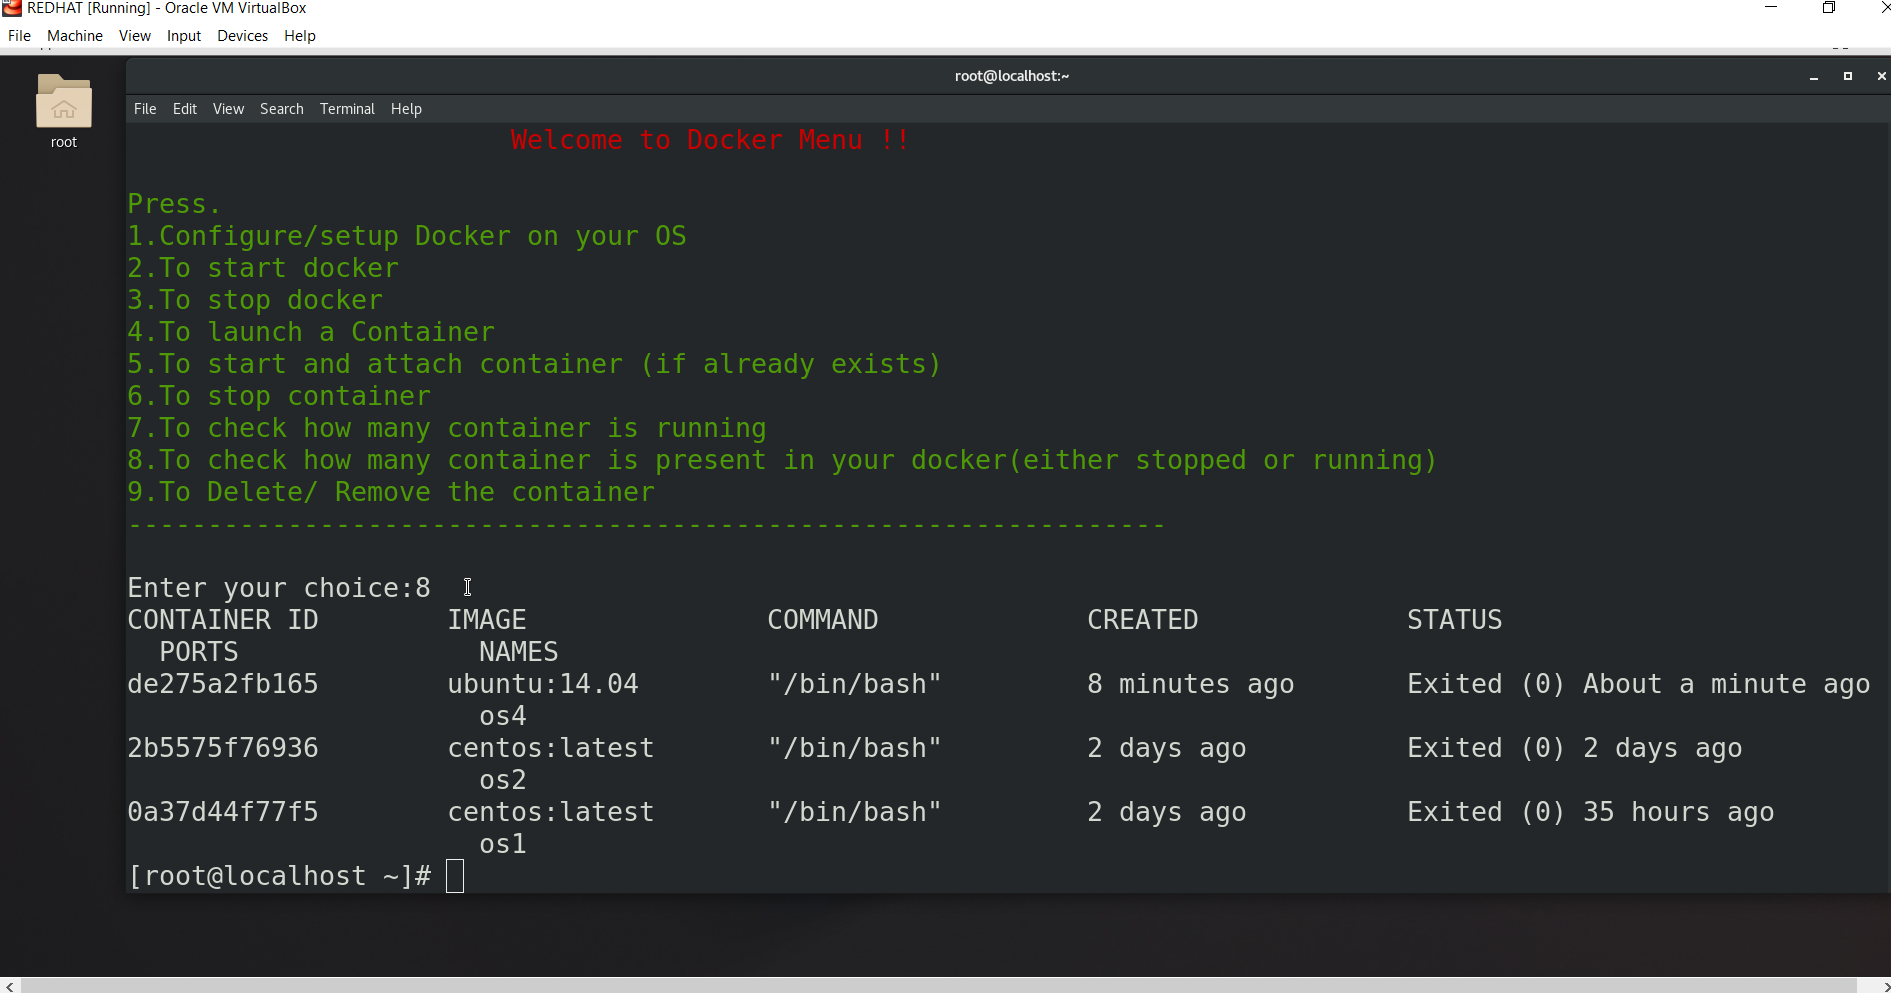
See, there are 3 contained which are in exited state.
STEP 9.
To delete/remove the container on docker

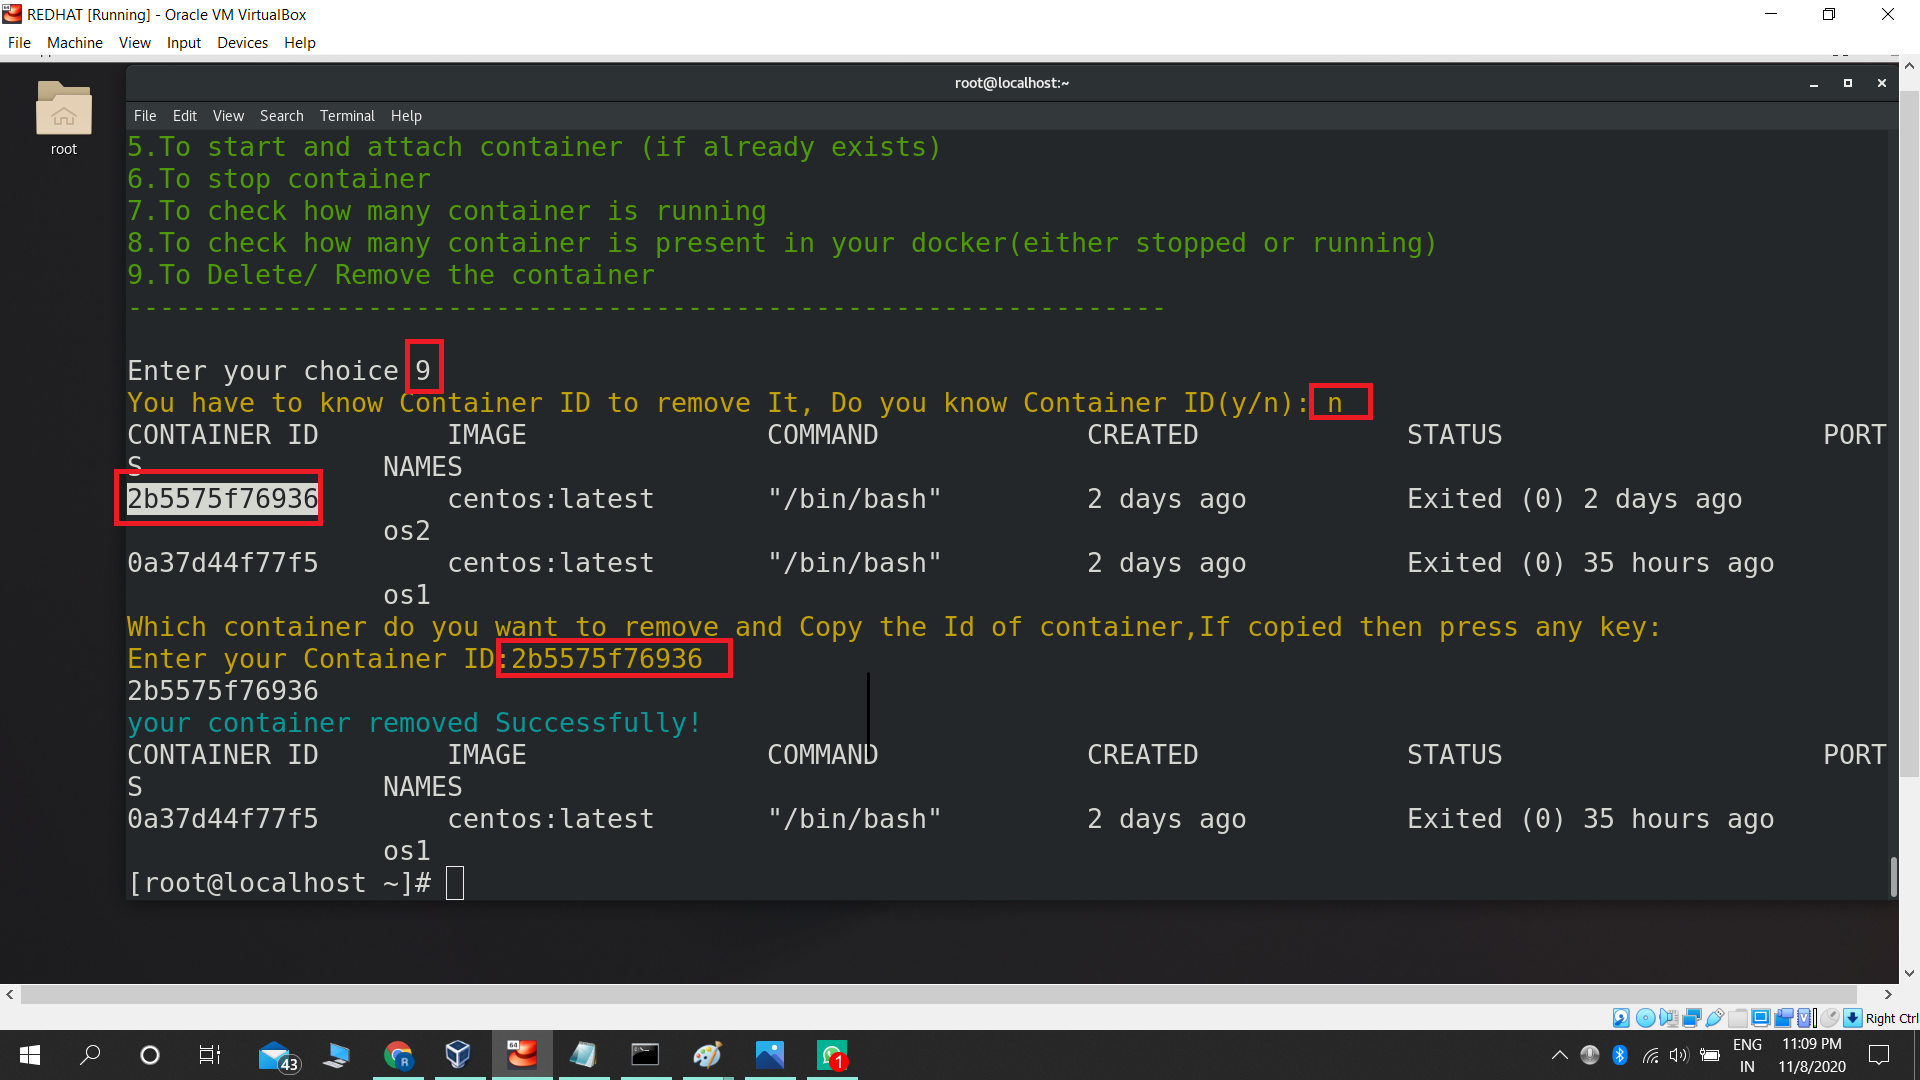
to removing container from Docker you have to know the id of container . so here, asking do you know container id . i do not so i pressed ’n’ ,then program showed me id Then I copied and gave the ID then It removed.
Hadoop
First we try and automate the process of setting up a system as a hadoop node, that maybe a namenode (master), datanode(slave) or even a client node in a hadoop cluster.
First we have to setup and install hadoop on our LinuxOS. This involves two steps:
Step1 — Installing jdk
Step2 — Installing hadoop
jdk-8u171-linux-x64.rpm
hadoop-1.2.1–1.x86_64.rpm
These are the rpm files required for our setup.
Either get these files first and then use ‘rpm –ivh jdk-8u171-linux-x64.rpm ‘ and ‘hadoop-1.2.1–1.x86_64.rpm — force’ commands respectively, or we can further automate this process by configuring our yum or dnf repository and using ‘yum install jdk-8u171-linux-x64.rpm’ and ‘yum install hadoop-1.2.1.-1.x86_64.rpm’ also we could use wget() and yum or dnf together to automate both download and installation together.
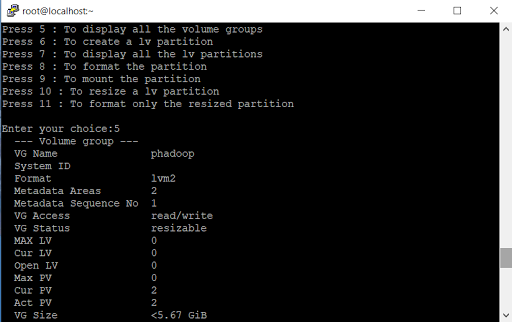
Now after installation we display our hadoop menu to execute further configurations according to requirements. These are the choices available:
Configure Hadoop as a namenode
Configure Hadoop as a datanode
Configure hadoop as a client node
User can choose the appropriate serial no.
For namenode:
import os,json
from requests import get
ip=json.loads(get(‘https://api.ipify.org?format=json').text)
ip=ip[‘ip’]
Using the above lines we can get access to the user’s system’s public IP address, it makes use of an expternal API
with open(‘/etc/hadoop/core-site.xml’, ‘w+’) as file:
str =“<property>\n<name>fs.default.name</name>\n<value>hdfs://”+ip+”:9001</value>\n</property>\n”
file.write(str)
with open(‘/etc/hadoop/hdfs-site.xml’, ‘w+’) as file:
str =“<property>\n<name>dfs.name.dir</name>\n<value>/nn1</vale>\n</property>\n”
file.write(str)
Now we have written both core-site and hdfs configuration files for a Hadoop namenode.
os.system(“hadoop namenode -format”)
Formatting the space for namenode
os.system(‘hadoop-daemon.sh start namenode’)
This helps us to start hadoop’s process on our OS.
For Datanode:
ip = str(input(“ Enter Master’s IP:”))
with open(‘/etc/hadoop/core-site.xml’, ‘w+’) as file:
Str=“<property>\n<name>fs.default.name</name>\n<value>hdfs://”+ip+”:9001< /value>\n</property>\n”
file.write(str)
with open(‘/etc/hadoop/hdfs-site.xml’, ‘w+’) as file:
str =”<property>\n<name>dfs.data.dir</name>\n<value>/dn1</value>\n</p roperty>\n”
file.write(str)
Asking for master’s public IP and writing both configuration files for hadoop datanode.
os.system(‘hadoop-daemon.sh start datanode’)
Starting hadoop’s process as a datanode on our OS.
For client setup:
ip = str(input(“ Enter Master’s IP:”))
with open(‘/etc/hadoop/core-site.xml’, ‘w+’) as file:
str = “<property>\n<name>fs.default.name</name>\n<value>hdfs://”+ip+”:9001</value>\n</property>\n”
file.write(str)
Asking for master’s public and configuring hadoop’s core-site.xml file for setting up the system as a client on a cluster.
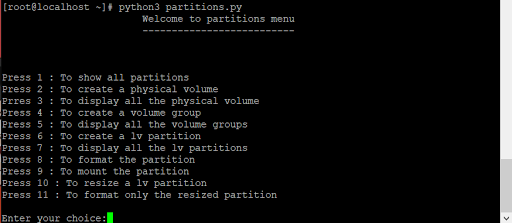
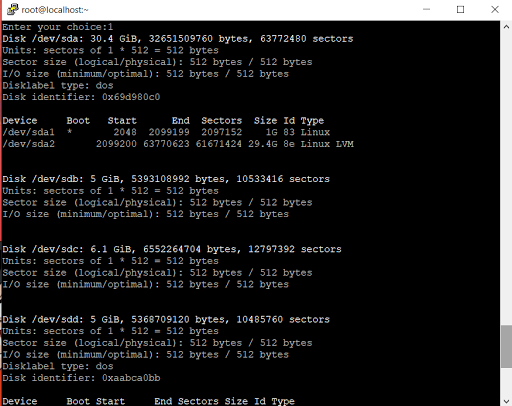
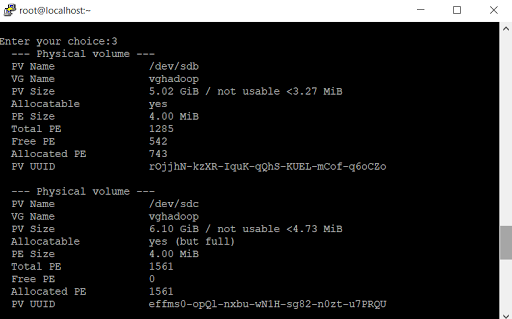
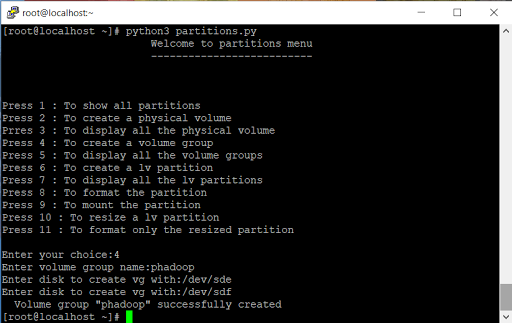
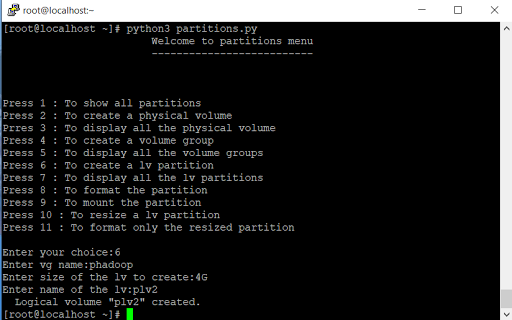
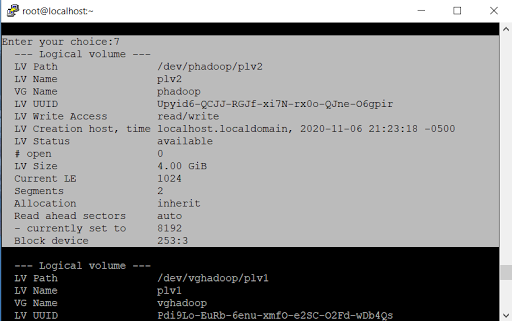
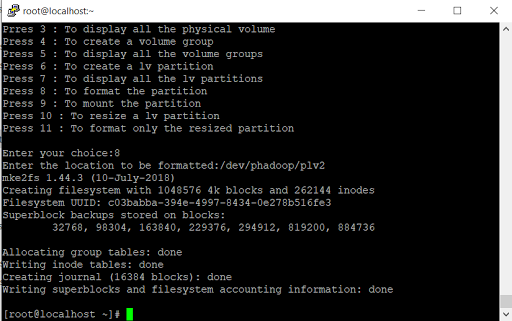
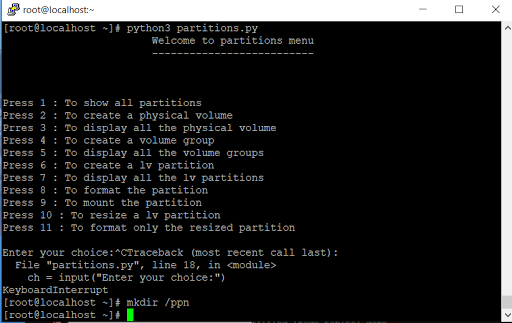
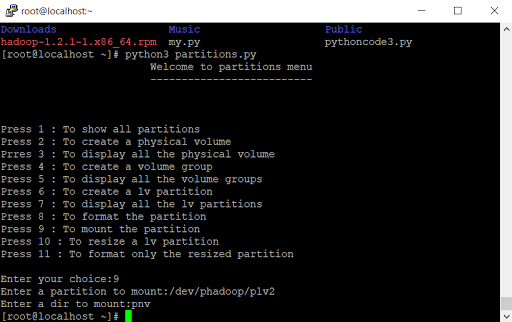
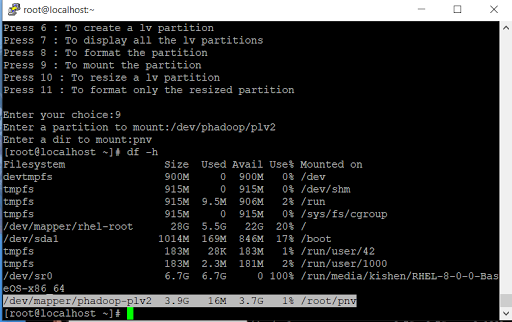
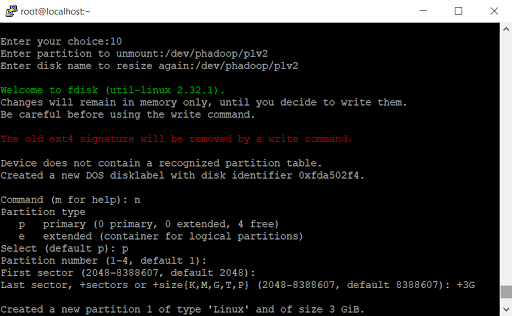
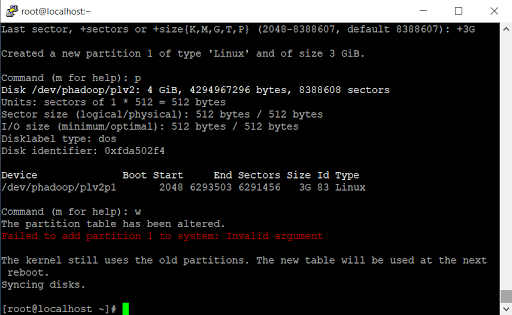
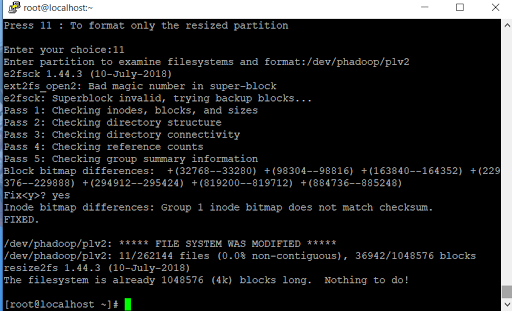
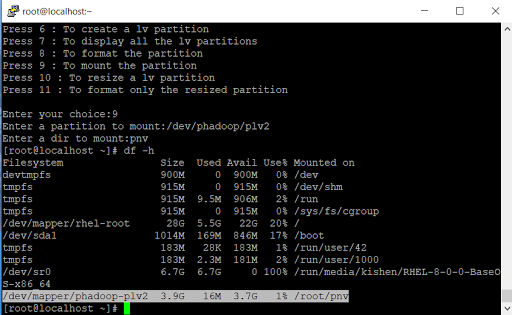
Automating LVM Partition using Python-Script
Automating LVM Partition using Python-Script


Automating AWS with Python Script
Key Features:-
✔Creates a key pair.
✔Creates a new ec2 instance.
✔Creates a security group.
✔Start an ec2 instance.
✔Creates an ebs volume.
✔Creates a cloudfront distribution.
✔Creates a s3 bucket.
✔Attach an ebs volume to an instance.
✔Detach an ebs volume.
✔Describe ec2 instances.
✔Terminate ec2 instances.
So, the first and foremost question that comes in our mind is →
What is AWS?
Amazon Web Services (AWS) is an evolving cloud computing platform provided by Amazon. It provides a mix of infrastructure as a service (IaaS), Platform as a service (PaaS), and Packaged software as a service (SaaS) offerings.
AWS can be accessed in 3 ways
- Using WEB UI(Web Interface (Console)).
- Automation (Application Programming Interface).
- Using CLI (Command Line Interface).
What is AWS CLI?
Let me start with an example….In WEB UI, we are using Chrome or any other browser as an interface to connect with AWS, Similarly… In CLI, to connect with AWS, we need an interface and this interface is AWS CLI.


Why do we use AWS CLI if we already have a WEB UI provided?
In the WEB UI, everything needs to be done manually and the CLI is mostly used to automate the things and make things happen faster or agile.
There are some benefits of using CLI over WEB UI such as -
If we want to launch many instances( let’s take a number ..say 10) in one go, we can’t do so using WEB UI. In WEB UI, we need to launch an instance manually 10 times, but in CLI, we can reduce the efforts and can launch many instances altogether.
If you are using a Linux server with no GUI, then you will have to manage AWS through the CLI. The CLI isn’t as user friendly as the web console (at least for beginners), but it does offer power users certain advantages. Writing custom scripts to automate processes is one major advantage that comes to mind. Generally, people who use the CLI like it for it’s more granular control over AWS services.
AWS documentation is really robust, with fully detailed docs listing all the CLI commands for various services. If you already have strong Linux skills, then using the CLI to manage AWS services should be fairly easy for you.
For the latest version of the AWS CLI: https://awscli.amazonaws.com/AWSCLIV2.msi
We need to download and install it on the top of the Operating System with which we are working. So, after installing to check whether it is successfully installed, use the command :
aws --version
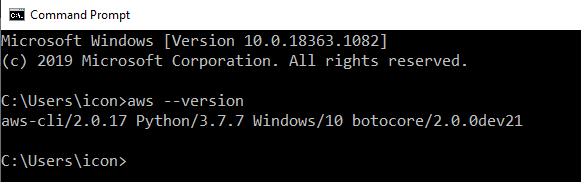
Now, as we can see AWS CLI is installed.

In order to access the AWS services from the CLI, we need to set-up an IAM user with appropriate permissions.
There are some steps to create an IAM user.
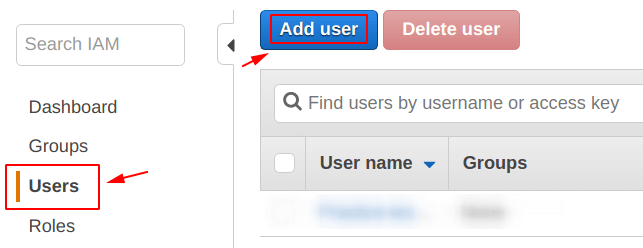
Step 1. From the AWS dashboard, search for the “IAM” service and select it.
Step 2. Now, you will be seeing something like shown below, from there select the “Add user” icon under the “Users”.

Step 3. On this screen, provide the details for the IAM user:
- User name = geekylane-CLI
- Access type = Programmatic access
We have only checked the “Programmatic access” because we only want this user to have access to “Command Line Interface”.
If you want to access it from the AWS management console also,you can select the second option too.
Step 4. Set Permissions →
Go with → Attach Existing Policies Directly.
Now select → POWER USER ACCESS
Create User
Remember I did not create any security group or any key pair while creating this IAM user.
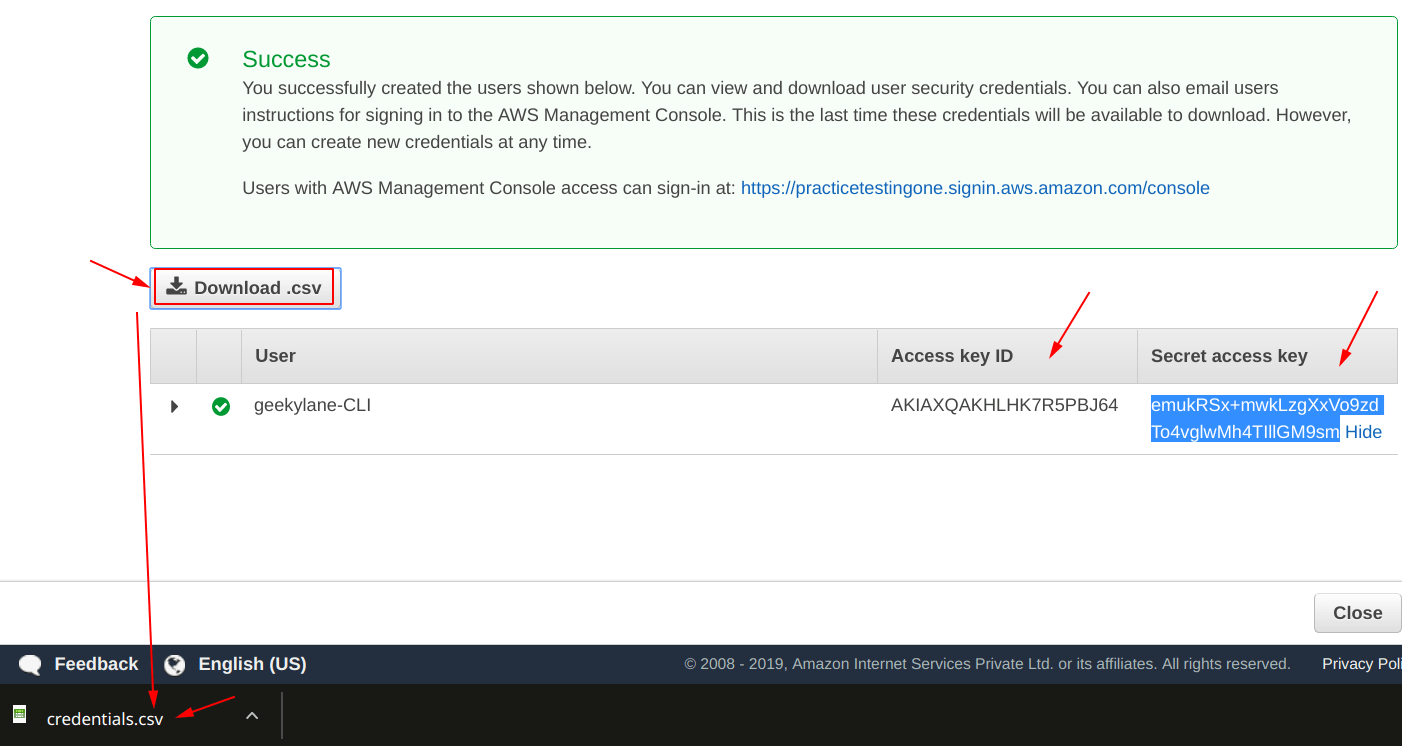
Step 5. Download “credentials.csv”
On this screen, you will be only prompted to download the “credentials.csv” file only once, so make sure you download them to your computer at this point.

So now we are done with the set-up of IAM user.
We now need to configure the IAM User that we just created. For the first time, we need to run this command.
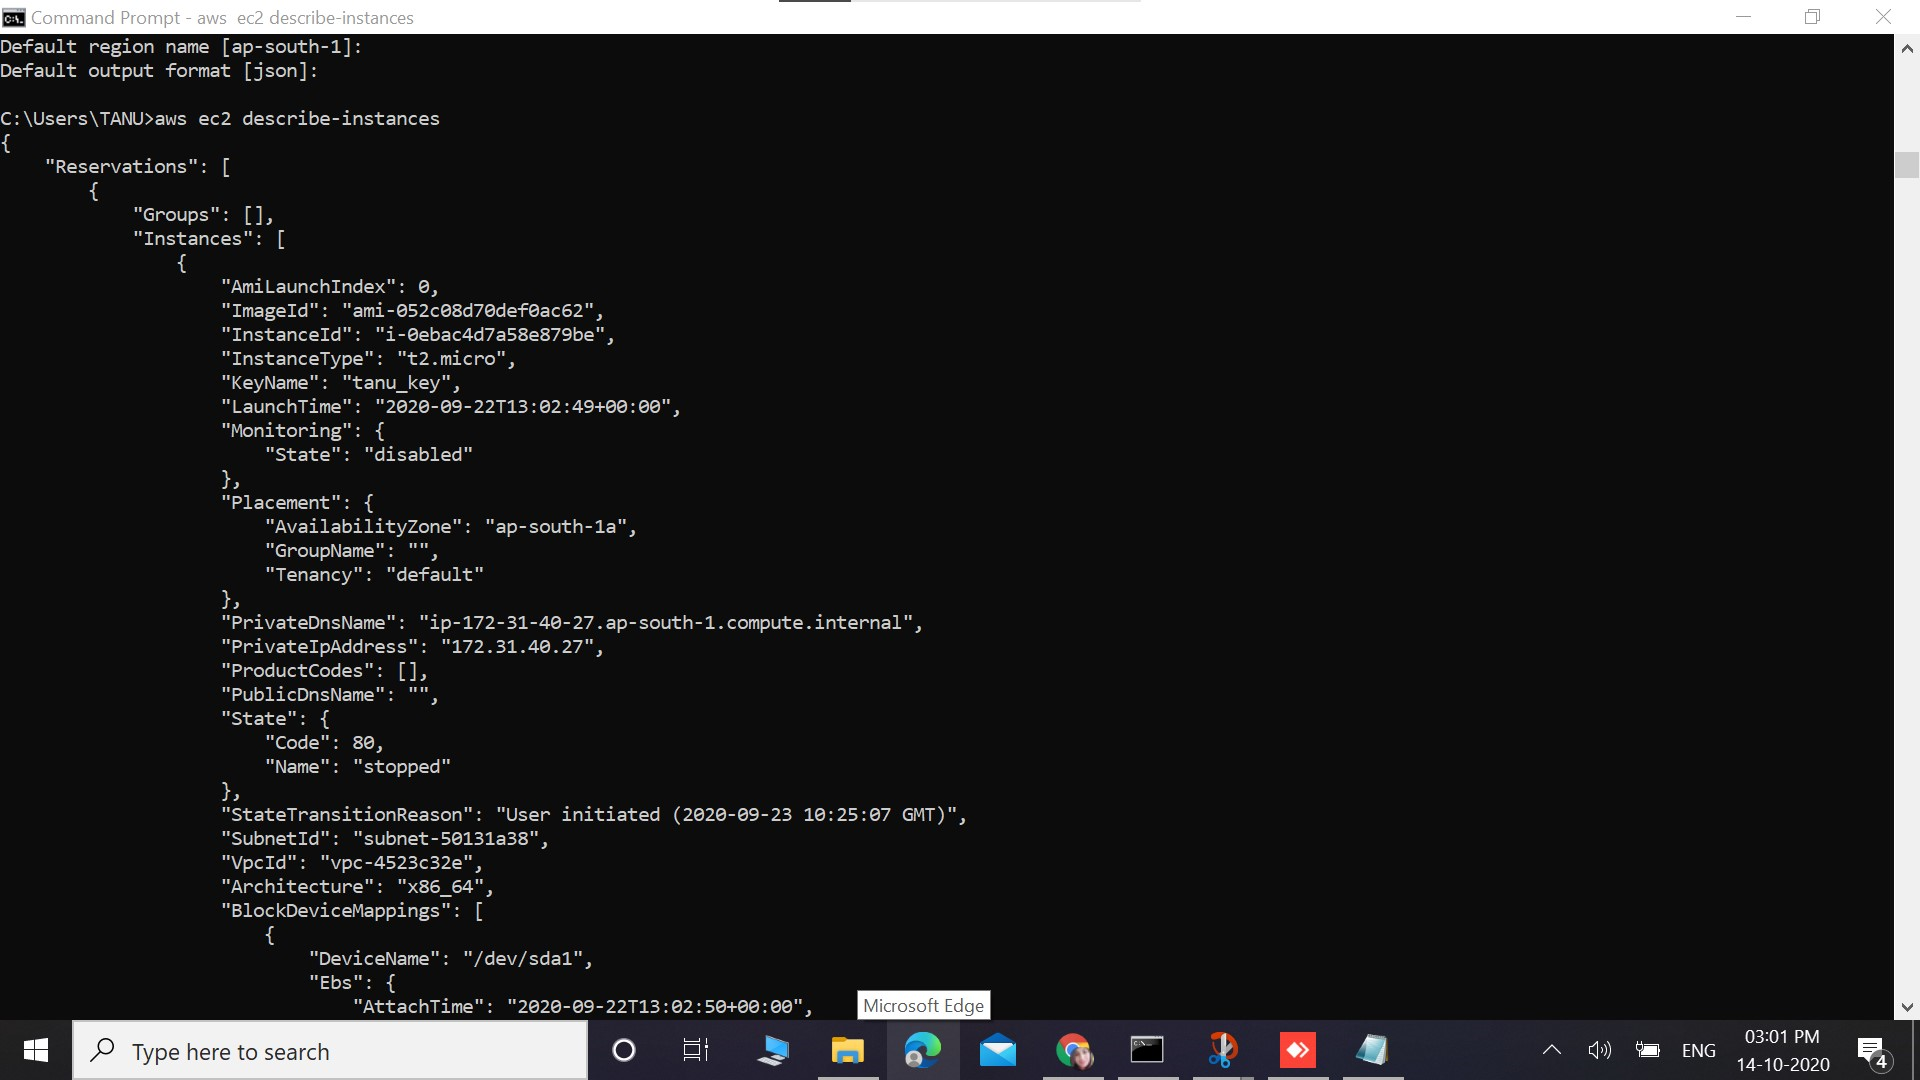
aws configureNow, we are done with the configuration/login part.
I verified it by veiwing all the previously present instance using the command
The name of the command.
NAME
       describe-instances
How can we create a new Key-Pair in our AWS account?
You can get help with any command when using the AWS Command Line Interface (AWS CLI). To do so, simply type help at the end of a command name.
For example, the following command displays help for the general AWS CLI options and the available top-level commands.
$ aws helpThe following command displays the available Amazon Elastic Compute Cloud (Amazon EC2) specific commands.
$ aws ec2 helpThe following example displays detailed help for the Amazon EC2
Now we can go with creating a key pair using the command provided in ec2 help. To create a key pair, use the create-key-pair command with the --query option, and the --output text option to pipe your private key directly into a file.
aws ec2 create-key-pair --key-name taskkey
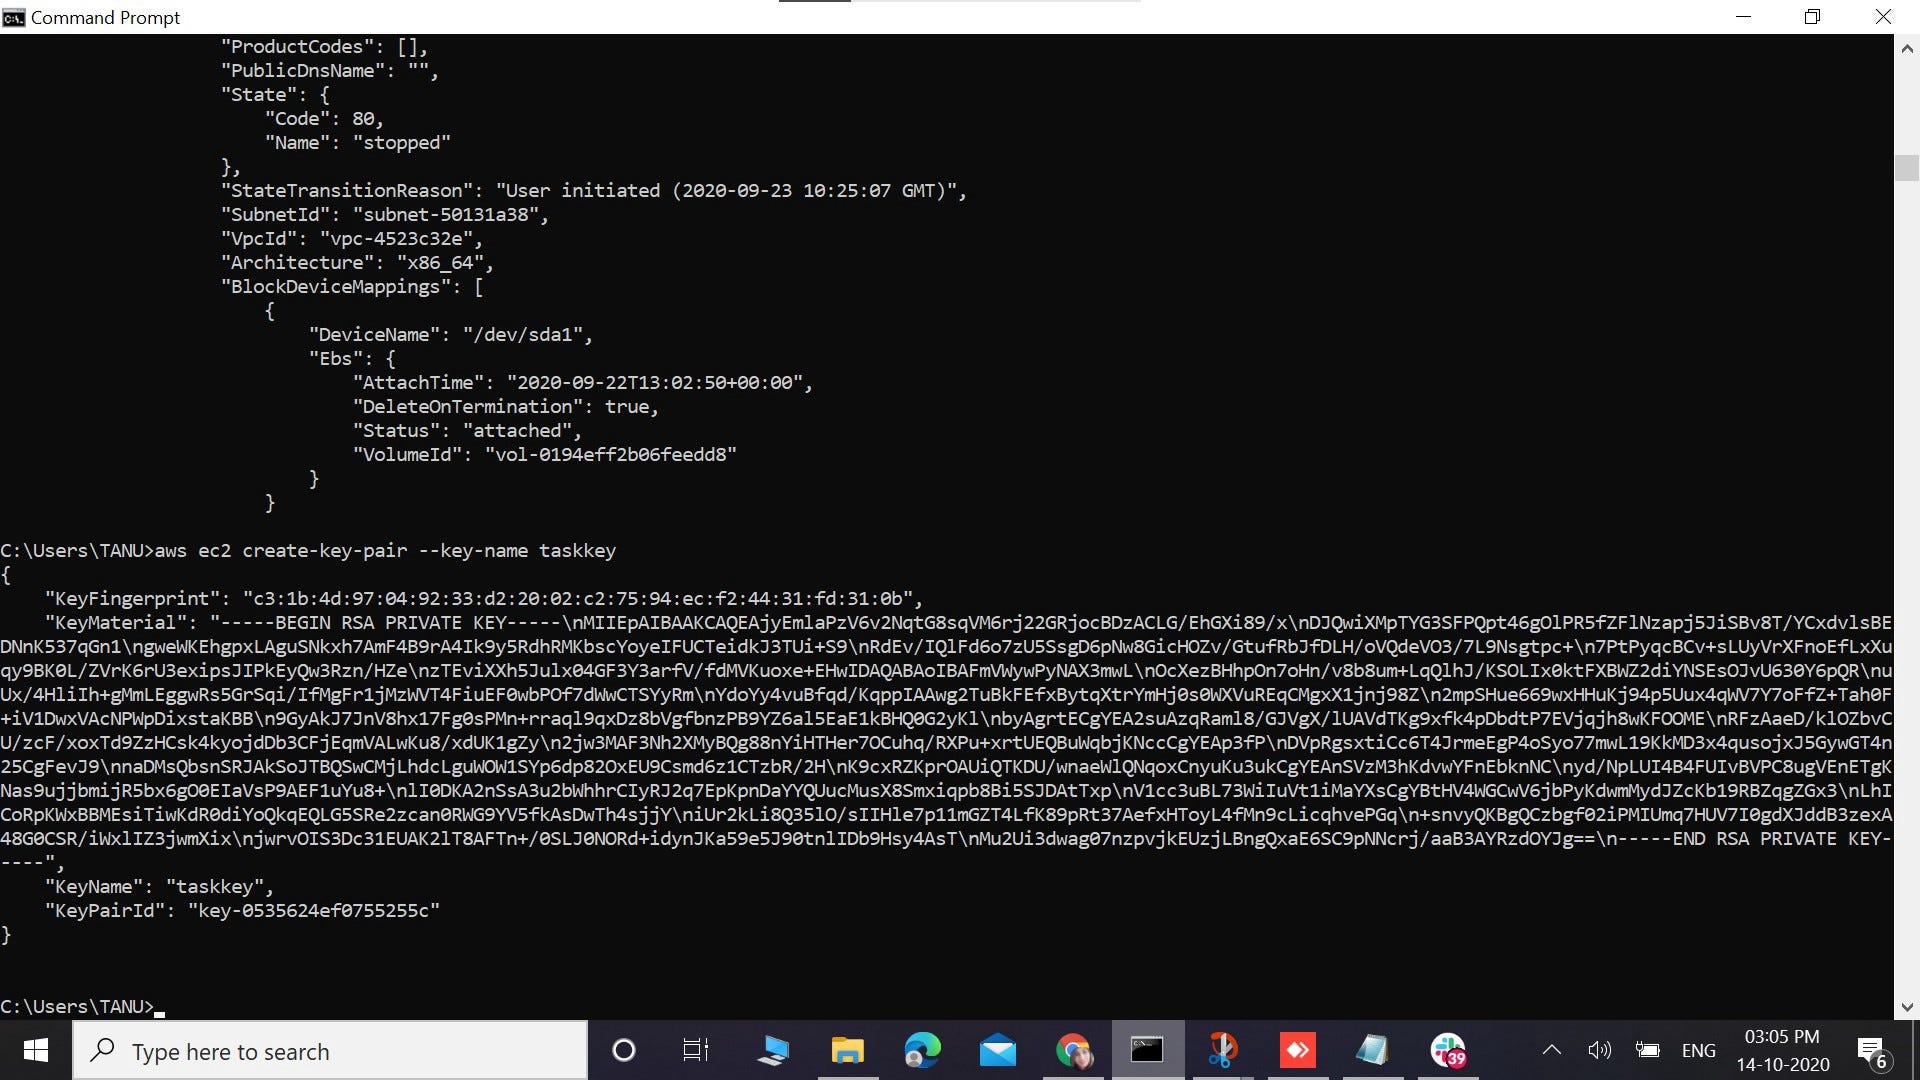
Now if i want to verify that my keypair is created successfully
I can do so by checking it in AWS management console too.

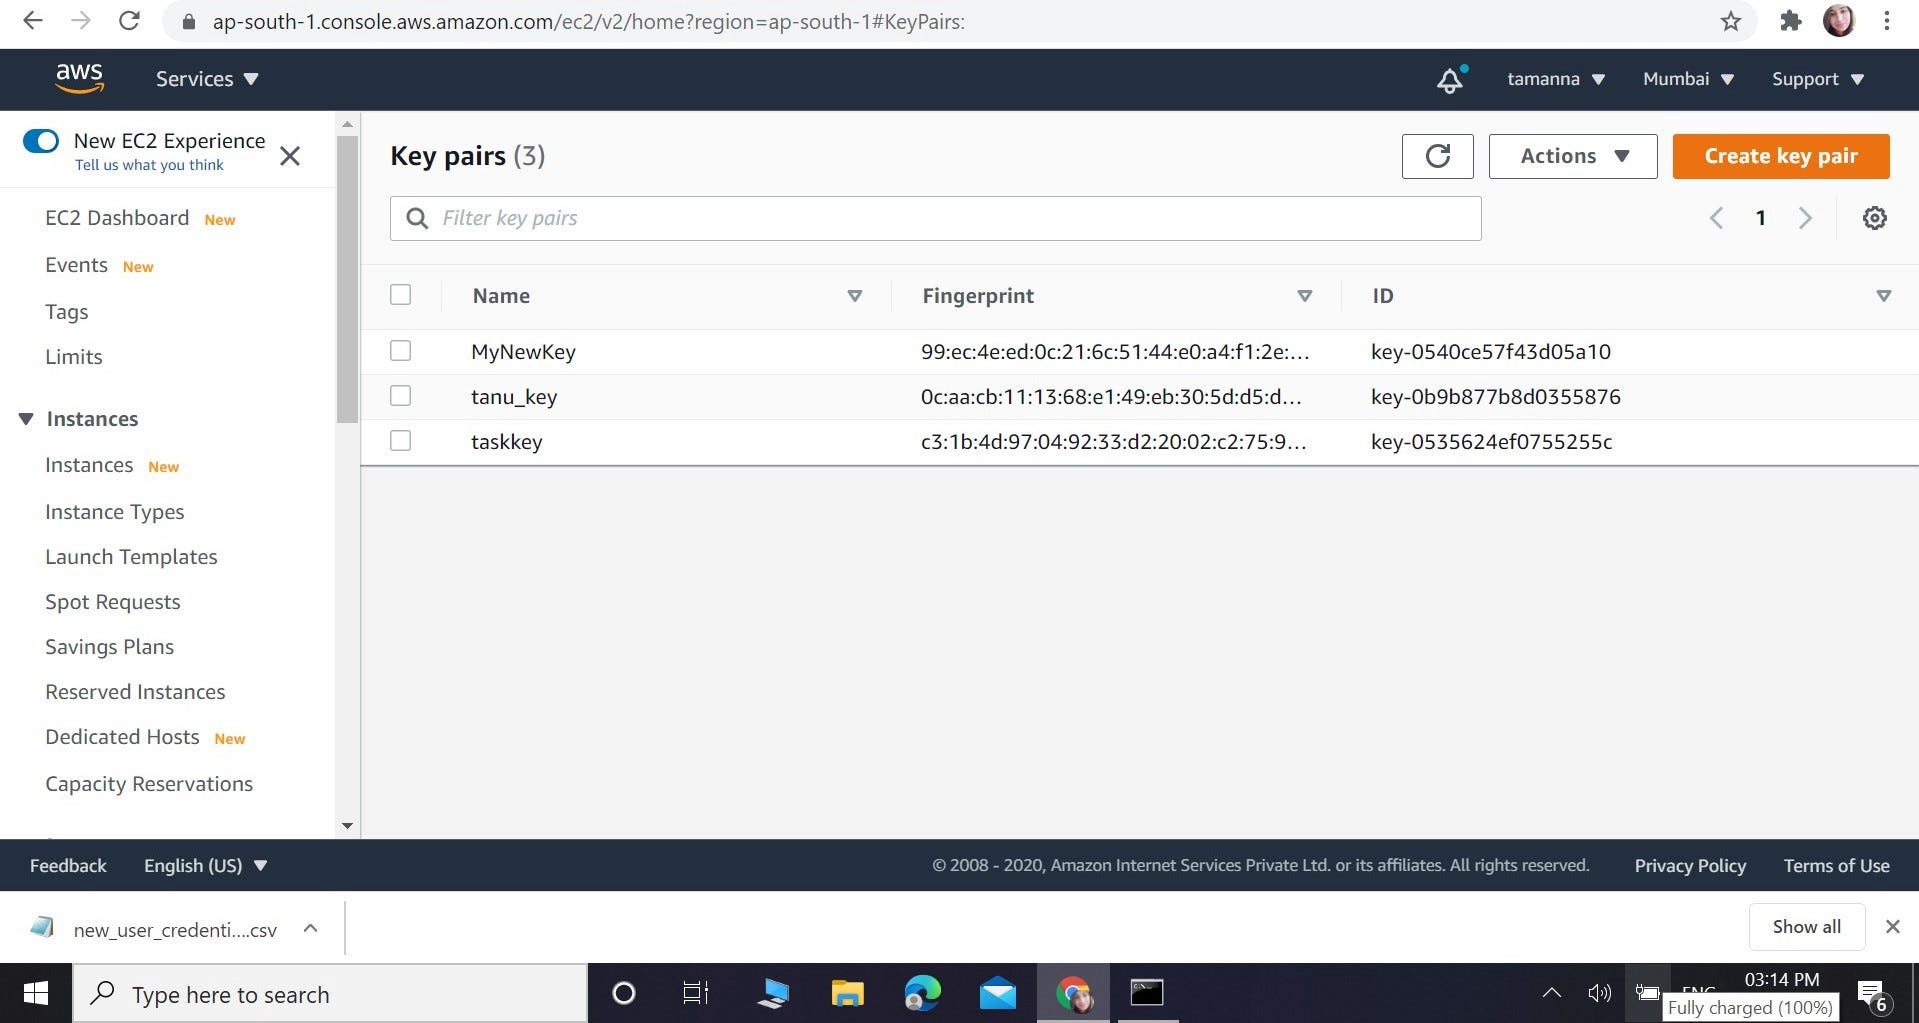
We can clearly see here that “taskkey “ is created.
How can we create a security group in our AWS account through CLI?
A question might arise in your mind..
What is a Security Group?
Amazon offers a virtual firewall facility for filtering the traffic that crosses your cloud network segment; but the way that AWS firewalls are managed differs slightly from the approach used by traditional firewalls. The central component of AWS firewalls is the “security group,” which is essentially what other firewall vendors would call a policy (i.e., a collection of rules)
Usually we create security group through AWS management console .
An example of how we create it using AWS Management Console is given below →

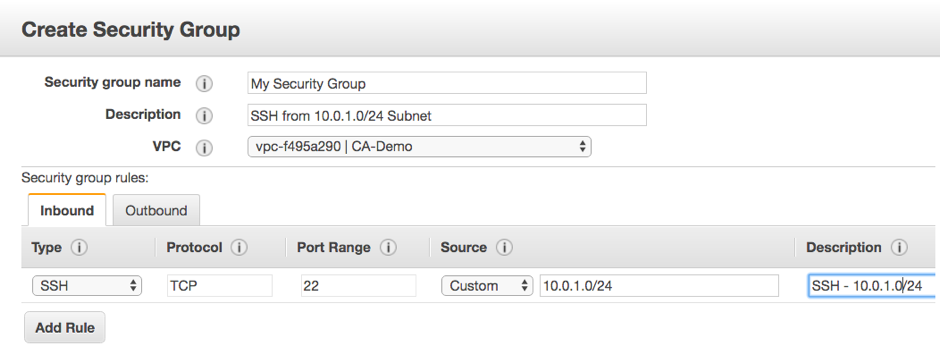
But now we want to create it through CLI …
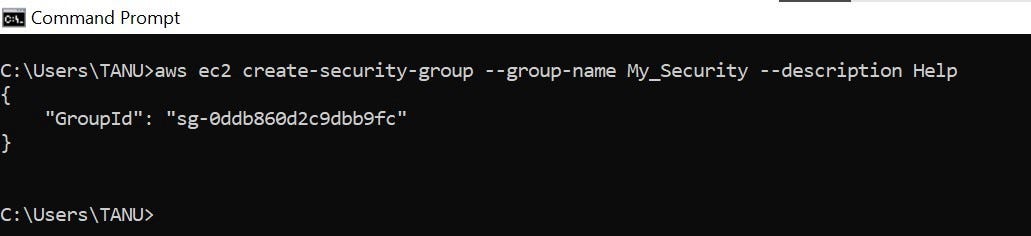
So now we are creating a security group..
Here i have given the group name → “My_Security “ and the group description →” Help”….You can give an appropriate group description .I just gave it for a test purpose.

— description (string) : used to give the description for the security group. This is informational only.
— group-name (string) : used to give the name of the security group.
— vpc-id (string) : [EC2-VPC] The ID of the VPC( Virtual Private Cloud) which is required for EC2-VPC.
So, we have our security group created.

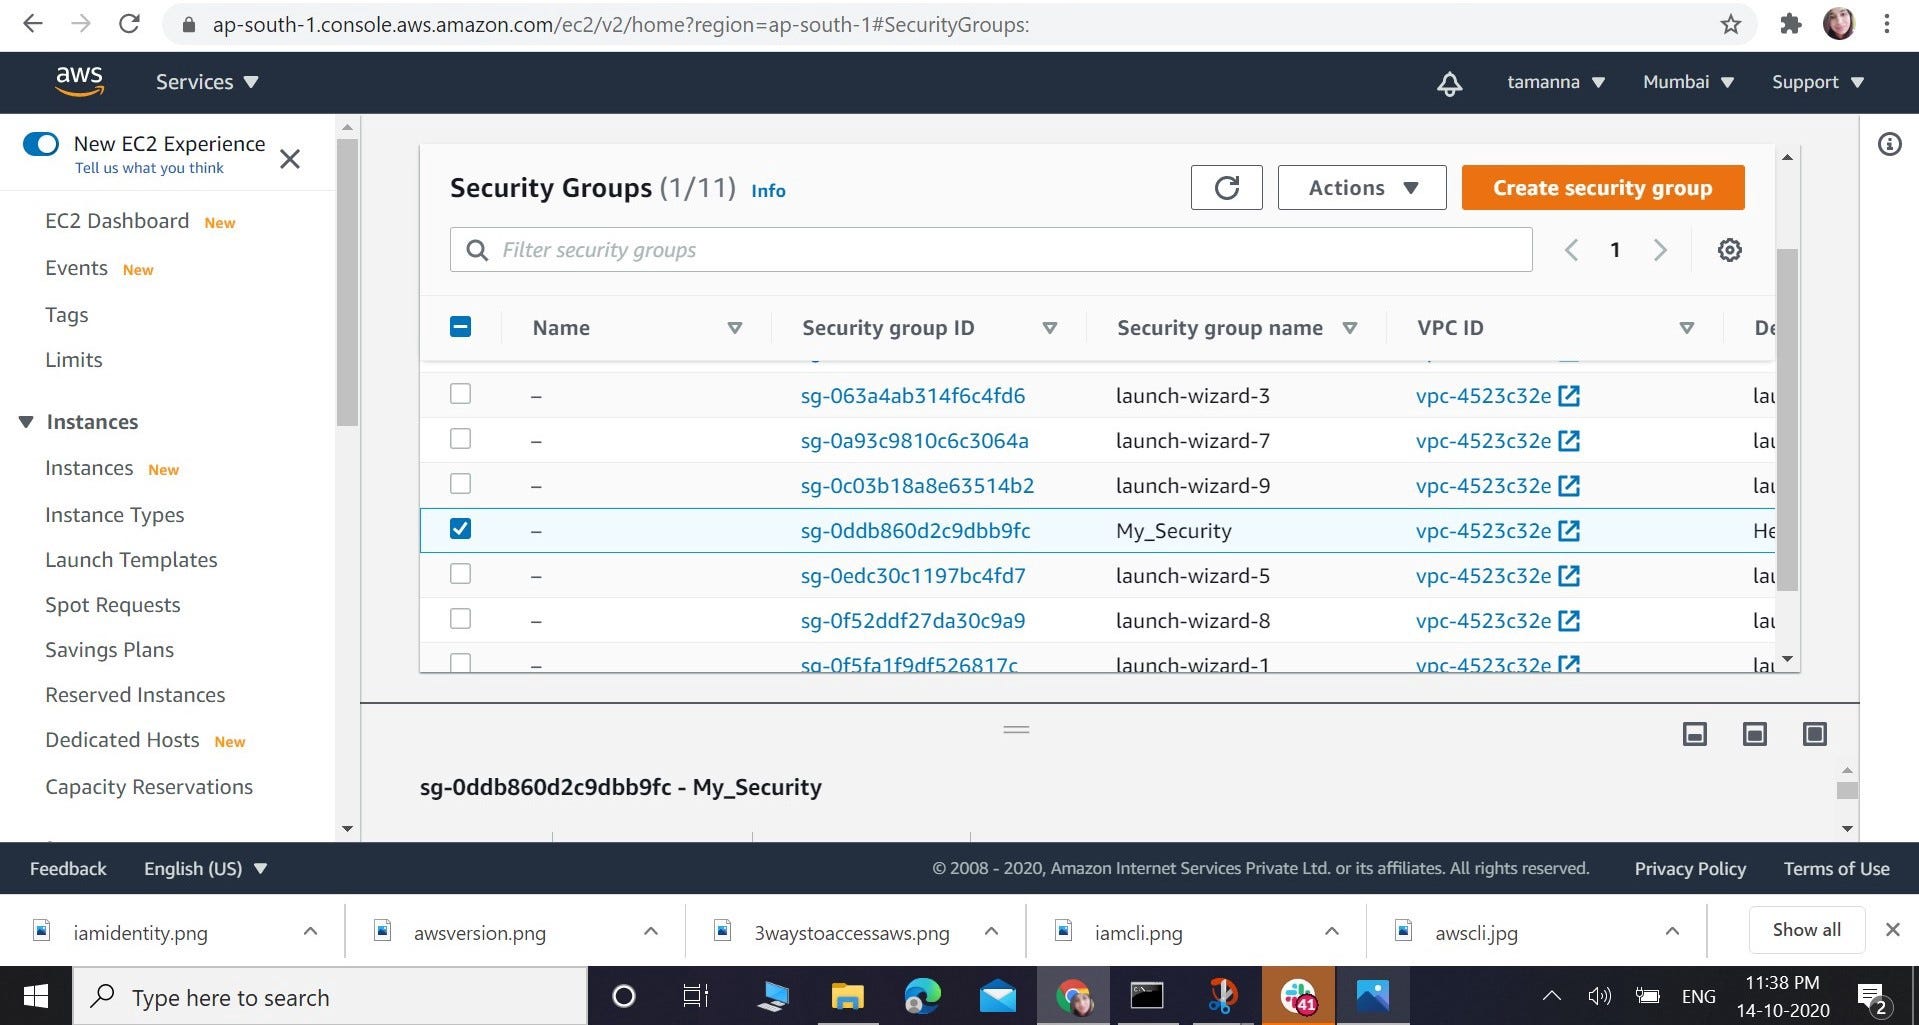
How can we create an EC2 instance from above created Security Group and Key pair using CLI ?
Now, lets create an EC2 instance. This instance will have the keypair and security groups attached that we created just now.
aws ec2 run-instances
--image-id ami-0e306788ff2473ccb
--instance-type t2.micro
--count 1
--subnet-id subnet-00b114a570c91caa6
--security-group-ids sg-04193d748e5fbc442
--key-name taskkey
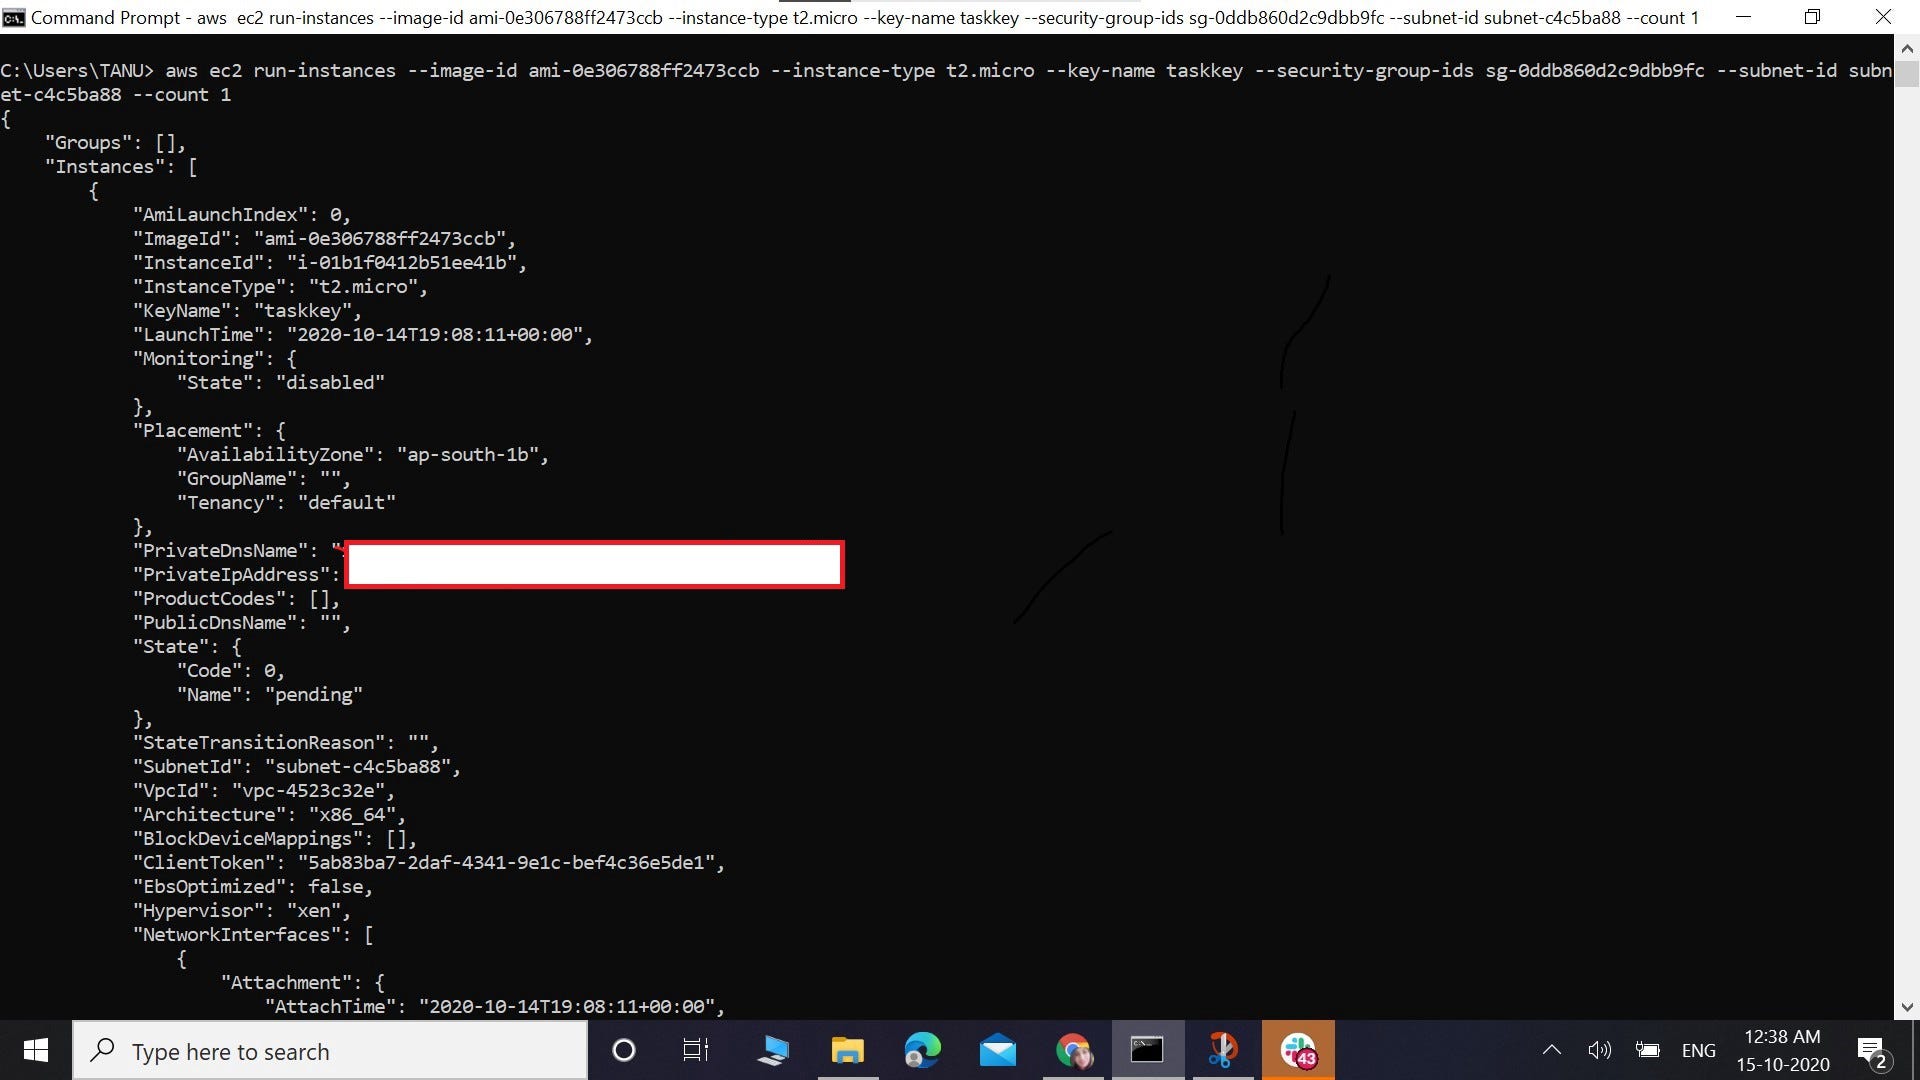
Our instance is created finally.

The instance which is at the top and has no name is the instance we just created.
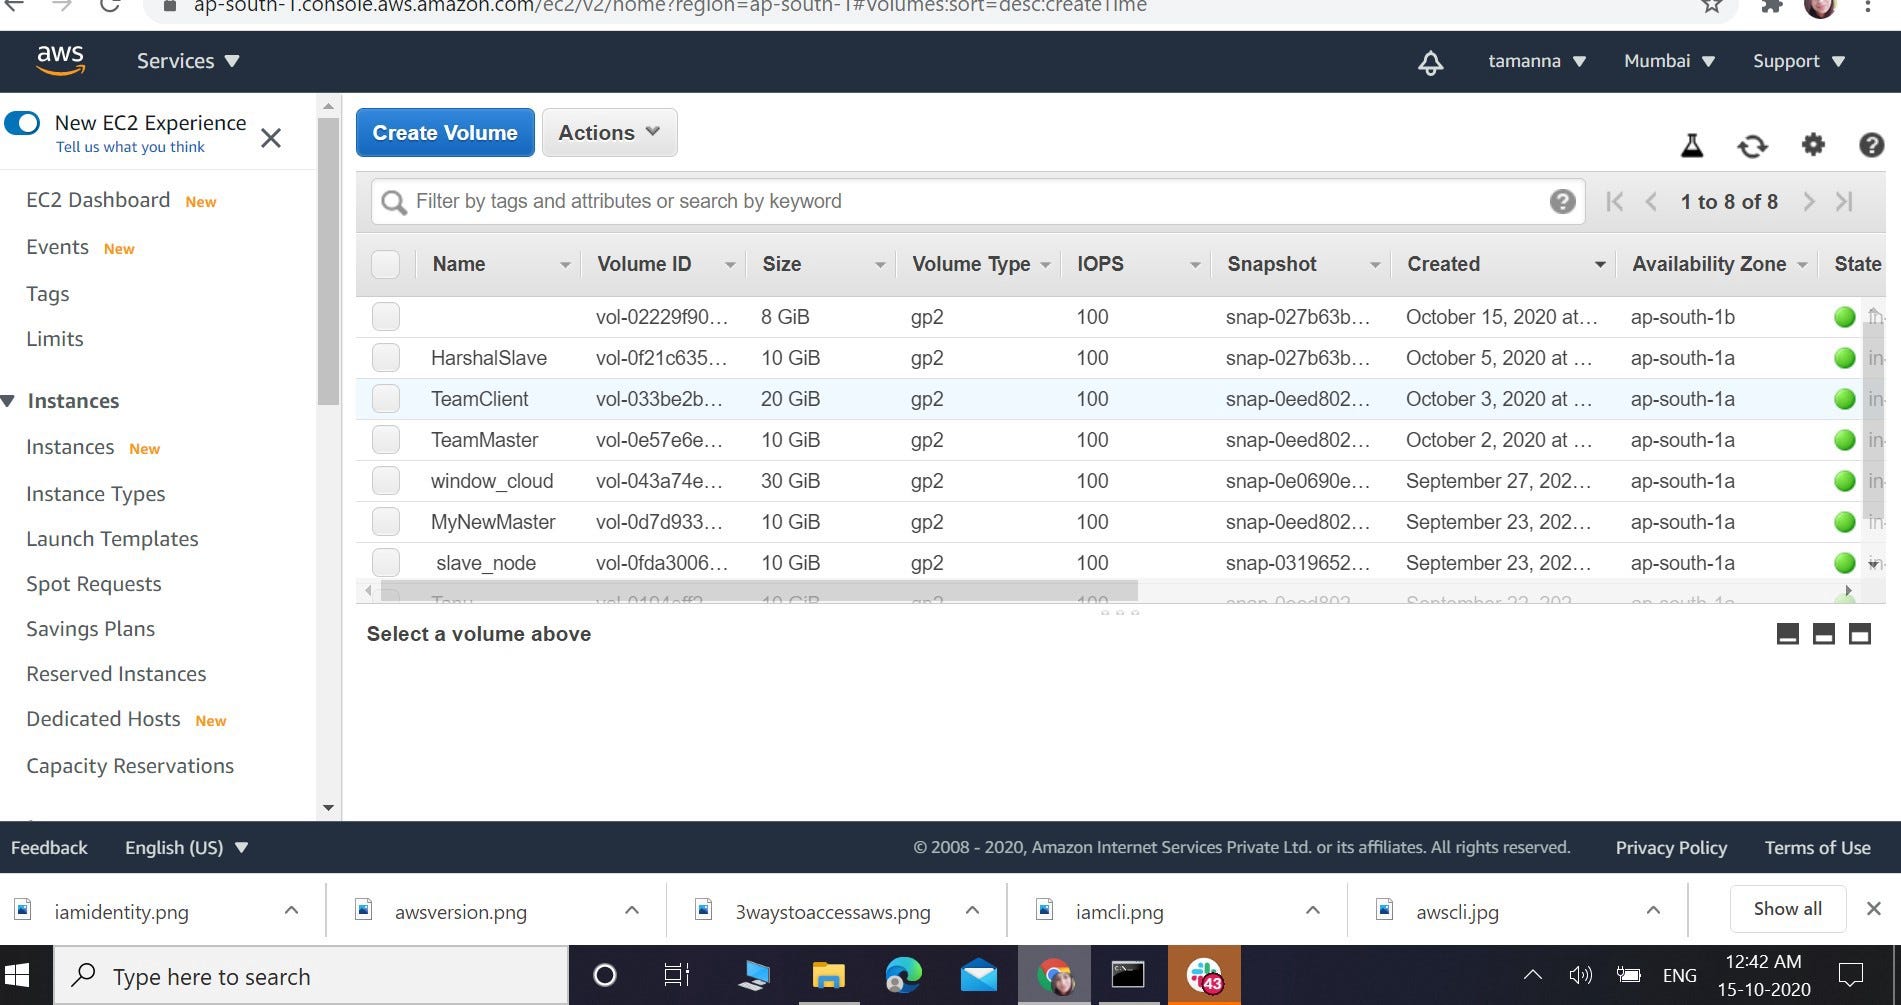
How can we create an EBS volume of 1GB from CLI ?
EBS comes under the EC2 service of AWS.
The volume type will be general purpose SSD Volume.
aws ec2 create-volume
--availlability-zone ap-south-1a
--size 1
--volume-type gp2

As we can clearly see that we created an EBS volume of 1 GB.


The upper one is the volume we just created.
How can we attach the EBS volume we created to the instance we launched from CLI ?
This volume we need to attach to the EC2 instance we have created earlier.
aws ec2 attach-volume
--volume-id vol-0ef37a7b52cf3c87b
--instance-id i-05bea6de1322b3aec
--device /dev/xvdh

As we can see the instance we created is attached to the EBS volume we created.
How can we detatch the EBS volume?
For this ,we can use the following command
— -> aws ec2 detach-volume — volume-id vol-0deea87bd15afcf09
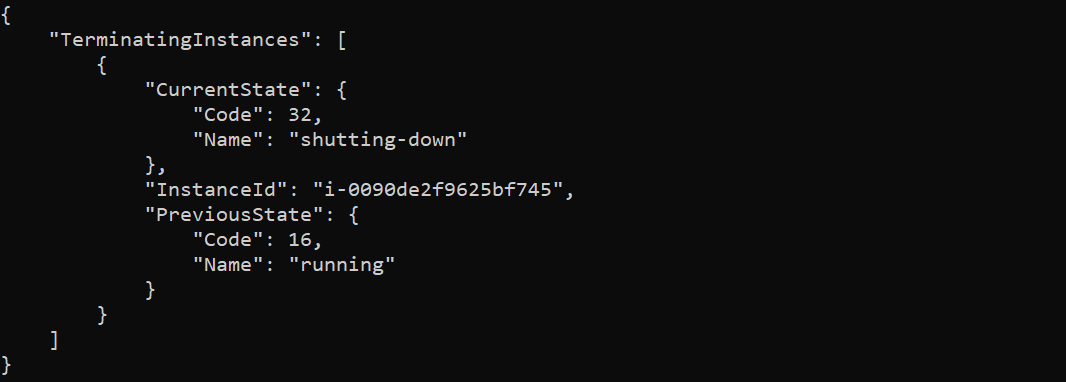
How can we terminate the AWS instance using CLI ?
To terminate the instance using CLI ,we can use the following command
→ aws ec2 terminate-instances — instance-ids i-0090de2f9625bf745


ARTH- The School of Technologies
ARTH2020.18.13
Sai Kishen Kothapalli
Tamanna Verma
Vaibhav Maan
Rahul Kumar


Comments
Post a Comment